HarmonyBuilder - Helping You Compose

HarmonyBuilder (Basic)

The easy-to-use music notation software for composing and sharing music scores.

User Manual

Version 1.2


                 Table of Contents

General Description
Installation
       1) Java
       2) Free Version
Program Characteristics
      1) Four Parts
      2) Four Navigation Modes
      3) Two Scrolling Modes
      4) Mouse-free Composing and Editing
How to Start a Score
Adding Empty Bars
The Square Cursor
Playback
Additional Features
       1) Copy & Paste Chords
       2) Copy & Paste Text
       3) Mass Delete
       4) The Text Tool
       5) The Line Tool
       6) Zoom
       7) Undo/Redo Actions
       8) Voice Muting
       9) MIDI Instruments
       10) Printing
Navigation Modes
      1) Note Mode
      2) Snapshot Mode
      3) Snapshot Mode (p/w)
      4) Step Mode
Lock Cursor Position
Rhythm
Repeated Notes
Alteration Format
Enharmonic Equivalents
Open and Save Functionalities
       1) Local Hard Disk
       2) Harmonic Sequences Archive
       3) Music Discussion Forum
       4) Auto-Save
Sharing the Score
Keyboard Controls and Shortcuts
Tool Tips


General Description
                                                                                                                                    

HarmonyBuilder (Basic) is a standalone music score editor designed to maximize the ease and speed of composing and editing, while at the same time structuring the compositional process into 4 independent parts. It is ideal for the exploration of complex harmonies and rhythms, particularly in chorale format, throughout the 26 major and minor keys, utilizing any combination of binary and ternary rhythms.

It employs intuitive controls which can be easily understood, with helpful pop-up Tool Tip windows for every command on the panel.

Installation


1) Java

HarmonyBuilder (Basic) will operate on any system that supports Java, including Windows and Macintosh.

In order to function, HarmonyBuilder (Basic) requires the Java Runtime Environment (otherwise known as "Java") which must be installed on your computer. This is a free download from www.java.com.

To find out if your computer has Java installed or not, go to
https://www.musilogic.com/harmonyhubforum/checkjava.jsp.

If it is not present, please carry out the installation. This will also enable the correct functioning of the websites HarmonyDiscuss.com and HarmonyArchive.com.

If, following the installation and launch of HarmonyBuilder (Basic), you do not hear any sounds, it is possible that, during the installation of Java on your system, the soundbank was not correctly installed in the Java > Audio folder inside the Program Files. To correct this, simply click on the button below for an automatic download of the required soundbank:

Get Soundbank


2) Free Basic (Demo) Version

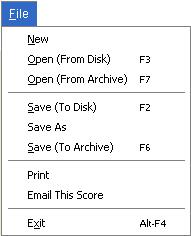
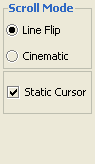
A free demo version of HarmonyBuilder (Basic) can be downloaded and installed from www.harmonybuilder.com. This can be used to play native HarmonyBuilder (Basic) files (.HaB format), but will not have some of the functionalities of the activated version, as seen by the greyed-out sections of the File menu show below:


To enable all the menu items, a Unique Activation Key must be purchased from www.harmonybuilder.com, and pasted into the Activate an Upgrade window.

Top

Program Characteristics

1) Four Parts:

HarmonyBuilder (Basic) allows for the insertion of 4 independent instrumental parts. Why does it allow no more than 4 parts?

Firstly, because the essence of all tonal music compositions can be expressed both melodically and harmonically within the confines of 4 parts. Once the foundation of the music has been composed in 4 part harmony, the composition can be exported to a more complex notation editor (many free editors are available) where the basic chords can be embellished and expanded.

Secondly, because this strategy makes it easier to compose. When every beat automatically contains 4 parts - Soprano, Alto, Tenor and Bass - the notes and rests can be quickly and easily manipulated. With just one click, rests can be converted to notes or chords; notes can be readily split into two or three smaller notes, or melded into larger notes, or simply reconverted to rests.

Thirdly, because by constraining the entire composition to 4 parts, it is possible to implement complex chord and voice-leading recognition algorithms, turning the editor into a powerful composition tutor and error-checking tool.


2) Four Navigation Modes

HarmonyBuilder (Basic) provides 4 independent navigation modes. See the section on Navigation Modes for a detailed description.

3) Two Scrolling Modes

(1) Cinematic Scrolling: The score will automatically scroll left or right, bringing the square cursor to the center of the screen each time it approaches the edge of the screen. This setting allows for note editing to always be performed at center stage!

(2) Line-flip Scrolling: With this viewing method, as the cursor reaches the far right of the screen, a fresh line of music is instantly replaced on the screen. This provides a stationary score, as an alternative to the moving score of cinematic scrolling, and has a faster response time than Cinematic scrolling 

4) Mouse-free Composing and Editing

Great effort has been made to reduce mouse-clicking to a minimum. Most of the commands for note navigation, editing, and playback can be executed with simple keyboard shortcuts or with the four arrow keys, and will allow for extensive “mouse-free” editing.

Top


How to Start a Score

Launch your copy of HarmonyBuilder (Basic) from the Start > Programs index or the Desktop Icon. The canvas will appear with only the treble and bass clefs visible. You must now begin entering the necessary parameters for your composition.

Step 1: Choose a Key Signature;
Step 2: Choose a Time Signature;
Step 3: Insert some empty bars. Each time you press Empty Bar > Add, one full bar will be inserted;
Step 4: Move to any rest in the empty bars, by using the arrow keys, or by clicking on it with the mouse;
Step 5: Insert a chord at this position, by clicking on Chord > Add;
Step 6: Navigate to any part of the score using the 4 arrow keys (slow navigation) or the Shift + right/left arrow (fast navigation);
Step 7: Convert any rest to a note, and any note to a rest, by clicking on the Delete/Insert button;
Step 8: Nudge any note into the desired position by using the Shift + up/down arrow keys;
Step 9: Split any note into two (or three) equal parts, or meld two (or three) equal notes together, using the Split and Meld buttons;
Step 10: Play the composition by pressing the Play button. Stop it by pressing the button again. Note: playback starts from the location of the square cursor.

The figure below summarizes the sequence of steps for creating a composition:


Note: When you insert a chord, by clicking Chord > Add, the program will always insert a Tonic chord, containing the Root, 5th, 3rd and the Root above.

Top


Adding Empty Bars

The first time Empty Bar > Add is pressed, a pop-up will appear, asking “Do you want to add Pick-Up Bar?” The pick-up bar allows for an empty bar to be entered before the numbered bars begin:

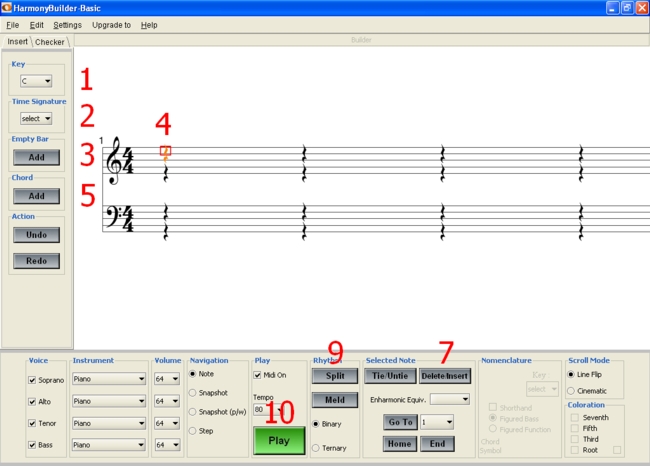
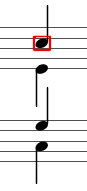
Each time the Empty Bar > Add button is clicked once, an extra bar, populated with rests, is added to the composition. The keyboard shortcut for adding an empty bar is Ctrl + Space Bar.

Top


The Square Cursor

The square cursor is the red box that encloses a note or rest, making it a target for actions like nudging, deleting, splitting or melding.

Square Cursor

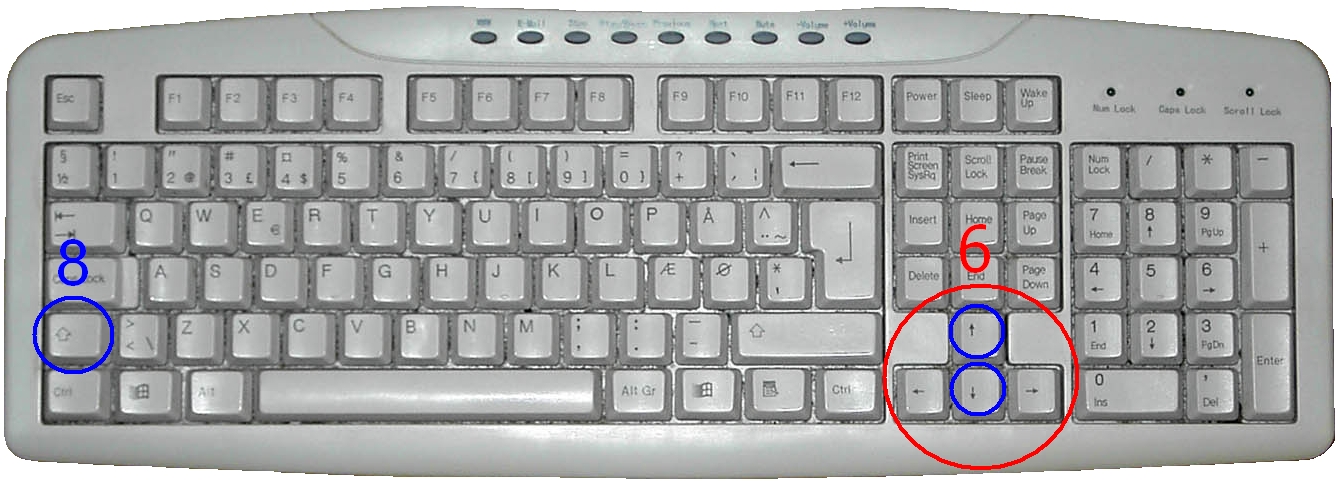
There are 6 ways of moving the square cursor to different parts of the score during the process of composition:

(1) Navigate through the notes using the left/right arrow keys. This is ideal for the initial stages of composition, where rests are being converted to chords.

(2) Press the Shift + left/right arrow keys. This will move the square cursor to the beginning of a bar, one bar at a time. This provides a faster method than the Go To menu for going to different bars in the music. Note: this feature will not work when Lock Cursor Position is selected.
 
(3) Select Lock Cursor Position and hold down the left/right arrow keys. This will scroll the score very rapidly to any location.

(4) Select a note, then press the Play button. When the score has reached the desired place, press the Stop button. Click on the dark area of a note to select it with the square cursor and hence set a new playback start position.

(5) Select a bar number in the Go To menu, then press "Go To". The score will jump to the desired bar.

(6) Press the Home key on your computer keyboard to jump to the first bar, or press the End key to jump to the last bar.

Note: the Home, End and Go To features are sometimes useful to ensure that scrolling takes place correctly, after extensive repositioning of the square cursor may lead to scrolling being de-synchronized.


Playback

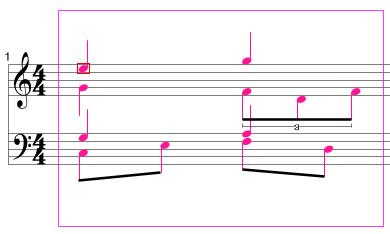
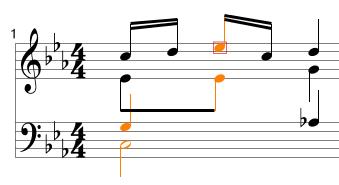
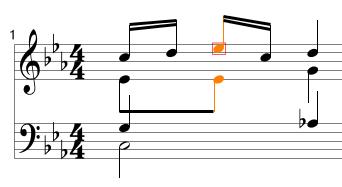
When the Play button is pressed, playback always starts from the position of the square cursor. The notes that are playing will turn orange, and the score will start scrolling in either Line-Flip or Cinematic mode. You can set the playback Tempo between 30 and 240 b.p.m. (beats per minute).

Playback can be stopped at any time, by pressing the Stop button (the Play button turns into a Stop button when the score is playing). Note that the square cursor will remain positioned on the starting note during playback. When the Play button is re-pressed after stopping, playback will start from the location of the square cursor.

Once the position of the square cursor is set , the same portion of music can easily be replayed for analysis, without having to reset the start position each time.

Top


Additional Features


1) Copy & Paste Chords

You can copy as many chords as you wish, and then paste them into another location. To select the chords you want to copy, do the following:

For Windows: press the Ctrl key + left mouse button, and drag the mouse over the relevant chords. This will enclose them in a pink box, and the selected notes will turn pink:

copied_chords

For Macintosh: press Control + mouse button. This will make the following icon pop up on the screen:

Paste

This indicates that the drag-selection feature is enabled. Now, press the mouse button again and drag over the notes you want to copy. This will enclose them in a pink box, and the selected notes will turn pink (as shown above).

When you release the mouse button, the copied notes will remain pink. This means they are ready to be pasted anywhere in the score. To paste them, place the square cursor on a rest where you wish the paste operation to take place. Important: for a correct paste, the paste location must contain only quarter-note rests. Next, press Ctrl + V, or press the right mouse button (Windows) or Control + mouse button (Macintosh), and select 'Paste' from the pop-up menu. This will copy the selected notes to the new location.

If you need to copy chords in multiple bars, the score will automatically scroll to the right (or left) when you reach the edge of the screen.

To de-select the copied chords, simply drag the pink box over the white space above or below the staff lines. Alternatively, you can press the Esc button on your computer keyboard, and then press "Deselect Chord" from the pop-up menu.


2) Copy & Paste Text

You can copy any of the text contained in the score by pressing Shift + left mouse button (Windows) or Shift + mouse button (Macintosh), then drag the pink box over the desired text. When you release the mouse button, a green arrow will appear on the score. This points at the location where the text will be pasted. You can change this location by clicking on different places in the score:

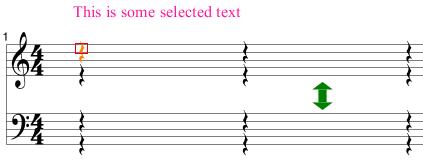
To paste the copied text, simply press Ctrl + V, or press the right mouse button (Windows) or Control + mouse button (Macintosh), and select 'Paste' from the pop-up menu.

To de-select the copied text, simply drag the pink box over an area containing no text. Alternatively, you can press the Esc button on your computer keyboard, and then press "Deselect Text" from the pop-up menu.


3) Mass Delete

This function can be used to delete entire portions of the score. First select the notes you wish to delete by enclosing them with the pink box, using the method described in the Copy & Paste Chords section. Next,
press the Delete button on your computer keyboard to convert all the notes to quarter-note rests, or use the menu item Edit > Mass Delete. If you wish to undo this operation, you can press the Undo button in the Insert panel, or press Edit > Undo.

Please note that the Mass Delete function can not be applied to text. Text can only be deleted by clicking on the individual text items, making the little red arrow appear next to the text, and then pressing the Delete key on your keyboard.

Top


4) The Text Tool

You can enable the Text Tool by checking the box under Settings > Enable Text Tool. The text box is opened by double-clicking the desired location in the score. You can then type some text into the text box. By clicking the mouse again (anywhere), the text will be committed to the canvas.

Text can be dragged
to different locations by clicking once on the text when the "hand" appears. This will make a little red arrow appear to the left of the text. The text is now enabled for "clicking & dragging". Click away from the text to disable "click & drag".

To further edit text that is already committed to the canvas, double-click on the text when the "hand" appears. This will open a Text Editor in the top-left corner of the screen. This will enable re-typing, as well as changing the font, size and type face.

Warning: The Text Tool will only function at the default zoom level, i.e Level 3 = Normal.


5) The Line Tool

You can enable the Line Tool by checking the box under Settings > Enable Line Tool.You can draw straight lines across any portion of the canvas, by clicking & dragging. Once a line has been drawn, you can select it by clicking on it when the "hand" appears (a little red arrow appears at one end of the line), and drag it by clicking again and dragging to the desired position.


6) Zoom

There are 5 zoom levels for the score:

Level 1:    Mini
Level 2:    Small
Level 3:    Normal (default zoom level)
Level 4:    Large
Level 5:    Mega

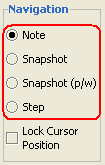
To activate a zoom level, use the Ctr + O to zoom out (smaller), or Ctrl + I to zoom in (larger).

Please note that the Text Tool and Line Tool only function correctly at Level 3 (Normal) zoom.


7) Undo/Redo Actions

Every action performed during the composition or editing process can be  
undone and redone, up to a total of  7 actions, using the Undo and Redo buttons.


8) Voice Muting and Volume

Each of the 4 voices - Soprano, Alto, Tenor and Bass - can be muted, using the adjacent check box.  Also, a volume can be assigned to each of the 4 parts, with a range of 0 - 127.


9) MIDI Instruments

Any of the 128 General Midi instruments can be assigned to each of the 4 parts.


10) Printing

A printable version of the score can be compiled, by selecting File > Print. Note: Printing of checker errors is only available in the Educational and Professional versions.

Top


Navigation Modes

Note: ensure that the Midi On checkbox is selected.

Use the 4 Arrow Keys on your computer keyboard      to navigate to all the notes and rests in the score. The aural and visual feedback during navigation can be set to one of 4 different modes:

Navigation Panel


Every note that is heard is visually reinforced with orange coloring. In the 2 "snapshot" modes (described below), this coloration feature highlights the subtle harmonies of inner parts, providing the user with a valuable analysis tool. Furthermore, the 4 parts are all completely independent, with separate volume and instrument controls.


1) Note mode

In this mode, the square cursor (which surrounds the selected note) will play the selected note as well as turn it orange. The left/right arrow keys will move the square cursor to adjacent notes within the selected part, while the up/down arrow keys will move the square cursor to the adjacent parts.

                                    
                                                                      Note mode


2) Snapshot mode

In this mode, the actively sounding notes at any instance in time can be heard and seen in orange. This enables the user to evaluate the interaction of later notes with previous notes whose sound holds over to the time when the later note is played. The left/right arrow keys will move the square cursor backwards or forwards one chord at a time. The up/down arrow keys will move the square cursor within the elements of the chord.

                                        
                                                                     Snapshot mode


3) Snapshot (p/w) mode (p/w means “part-wise”)

The aural and visual feedback is the same as the Snapshot mode, but there is a restriction on the way the square cursor moves through the score. The left/right arrow keys will move the square cursor to adjacent notes within the selected part, while the up/down arrow keys will move the square cursor to the adjacent parts.


4) Step mode

In this mode, only the notes within the vertical line selected by the square cursor will be heard. The square cursor’s navigation is identical to Snapshot mode, which is:  the left/right arrow keys will move the square cursor backwards or forwards one chord at a time. The up/down arrow keys will move the square cursor within the elements of the chord (all the chord notes will be heard at each movement of the square cursor).


                                                                         Step mode


Lock Cursor Position

Lock Cursor Position allows the user to move very rapidly through the music, one step at a time. This is ideal for speed editing. It can be used in combination with any of the 4 navigation modes.


Lock Cursor


To enable this feature, check the "Lock Cursor Position" checkbox in the Navigation panel, and use the right/left arrow keys to move through the score. The square cursor will remain in a fixed position throughout the scroll.

LockCursorPosition
Lock Cursor Position

Top


Rhythm

When Chord > Add is pressed:

  • For Time Signature = 3/2, the basic note duration is the half note.
  • For Time Signatures = 2/4, 3/4, 4/4 and 6/4, the basic note duration is the quarter note.
  • For Time Signature = 6/8, the basic note duration is the eighth note

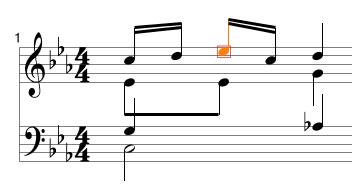
Therefore, to obtain note durations that are different from the basic note duration for the chosen Time Signature, use the Split and Meld buttons.

Splitting creates shorter notes, and melding creates longer notes. Please note that melding will only occur between notes of equal pitch and duration.

Split > Binary: this will convert the selected note into two notes with half the duration of the selected note.
Meld > Binary: this will convert the selected note into one note with twice the duration of the selected note, provided there is a note of equal pitch and duration on the right of the selected note.

Note: melding is not possible between notes of equal pitch and duration in separate triplets: a pop-up will suggest using the Tie/Untie button instead.

Split > Ternary: this will convert the selected note into three notes with one third the duration of the selected note.
Meld > Ternary: this function can only be applied to the first note of a triplet. It will convert the selected note into one note with three times the duration of the selected note, provided there are two notes of equal  pitch and duration on the right of the selected note.

The following diagrams show the different levels of division obtainable with binary and ternary splitting:


Top


Repeated Notes

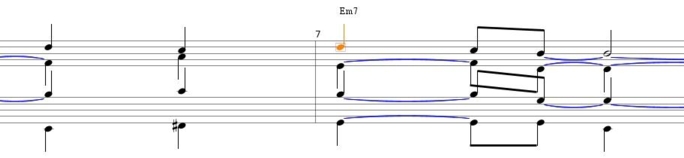
Any two neighboring notes, provided they have identical pitches, can be tied together. They do not need to have the same durations. The result is to extend the duration of the first note by the duration value of the second note.

Any tied notes can be untied by simply re-pressing the Tie/UnTie button.


Alteration Format

Any selected note can be nudged up or down the chromatic scale by using the Shift + up/down arrow keys. The note alteration symbols have been chosen to reflect the most commonly used chord extensions on a dominant chord. For example, in the Key of C major, we have the following extensions of a G7 chord:

                            
                           G = root
                        Ab = flat ninth
                            A = ninth
                          A# = sharp ninth
                            B = third
                            C = fourth
                          Db = flat fifth
                            D = fifth
                         D# = sharp fifth
                            E = thirteenth
                            F = seventh
                          F# = major seventh

 while in the Key of C minor, we have the following extensions of the G7 chord:


                           G = root
                         Ab = flat ninth
                            A = ninth
                          A# = sharp ninth
                            B = third
                             C = fourth
                          Db = flat fifth
                            D = fifth
                          Eb = flat thirteenth
                            E = thirteenth
                            F = seventh
                          F# = major seventh
Top


Enharmonic Equivalents

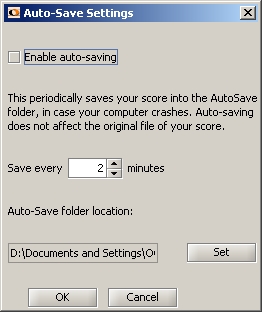
If notes need to be named differently from the way they are written automatically by the program, use the Enharmonic Equivalent  drop-down menu (Enharmonic Equiv.), in the Selected Note panel, and select any of the alternative name options for the selected note.


"Open" and "Save" Functionalities


1) Local Hard Disk

Any file having the .HaB format (HarmonyBuilder format) can be opened with HarmonyBuilder-Basic (Demo). If the application is activated, it will also save to the local hard disk, both in .HaB format and MIDI format (ensure that Settings > Create Midi File is checked)


2) Harmonic Sequences Archive

If the application is activated, it will save save to and from the Harmonic Sequences Archive, a free, public, music score archive, hosted by HarmonyArchive.com .


3) Music Discussion Forum

If the application is activated, it will confer Super User status to the email address used to purchase the Activation Key. If this email is used to login to the HarmonyDiscuss.com, and provided you use the same computer on which HarmonyBuilder was activated, the Player and Editor applets inside the Forum will also allow saving forum compositions to the local hard disk, or importing compositions from the local hard disk to the Forum


4) Auto-Save

If the application is activated, it will be possible to enable auto-saving. To do so, go to Settings > Auto-Save, and check the "enable auto-saving" check box. The default location of the "autosaved_backup.HAB" file is shown in the Auto-Save Settings panel. This can be re-set to another location, if desired. The backup file does NOT overwrite the file saved manually by the user using the File > Save (To Disk) menu.

The intervals at which the auto-save is performed can be changed manually. By default, it is every 2 minutes.


Sharing the Score

An important feature of HarmonyBuilder (Basic) is its capability to easily share compositions over the Internet. There are 3 ways this can be done:

1) Once a composition has been completed, it can be saved to a free public archive, hosted by HarmonyArchive.com, where anyone can see the composition link and click it to see and play the score. This is ideal for providing a showcase for a composition, as well as creating a permanent archive of the score. The upload date is automatically included, providing documentary evidence of its publication date.

2) Compositions can be uploaded to a password-protected private database, accessible over the Internet, but only to those people who know the access password. This is ideal for teachers, students, or workgroups who wish to share compositions among themselves, but not with the wider world. Contact e-mail address for subscription details.

3) Compositions can be shared with a friend (or group of friends) by e-mail. From the File menu, select Email This Score. This will open a form which allows the user to enter up to 10 e-mail addresses. Once the form is sent, the composition is stored on the server for no less than 7 days, and the recipients of the email will then be able to click on a dedicated hyperlink that opens the composition in their browser. This is ideal for sharing musical ideas between two or more people via email. This service is free.

Top


Keyboard Controls and Shortcuts

A few commands can only be executed via the keyboard, and have not been included on the screen panel, in order to keep it uncluttered. Here is a comprehensive list:

                                                  Commands only available via computer keyboard:

Command Function
Up arrow Moves square cursor up one part (Note mode and Snapshot (p/w) mode only)
Down arrow Moves square cursor down one part (Note mode and Snapshot (p/w) mode only)
Right arrow Moves square cursor to next note (according to navigation mode)
Left arrow Moves square cursor to previous note (according to navigation mode)
Shift + Right arrow Scrolls the square cursor rapidly to the right
Shift + left arrow Scrolls the square cursor rapidly to the left
Ctrl + left mouse button Drag-select notes to be copied
Shift + left mouse button Drag-select text to be copied


Most of the commands are accessed with the mouse, via on-screen buttons and menus. Below is a comprehensive list. The list includes the relevant keyboard shortcuts:

                                      Commands available on screen (plus keyboard shortcut):

Mouse Command Function Keyboard Shortcut
Edit > Nudge Note Up Nudges note one step up Shift + up arrow
Edit > Nudge Note Down Nudges note one step down Shift + down arrow
Play button Start/Stop Enter
Delete/Insert button Changes note to rest, or rest to note Ctrl + Del
Edit > Remove Chord Delete an entire chord Ctrl + Shift + Del
Split (Binary) button Split a note into two equal, shorter notes Ctrl + S (binary radio button selected) OR Ctrl + 2
Meld (Binary) button Combine two equal notes into a single, longer note Ctrl + M (binary radio button selected) OR Ctrl + Shift + 2
Split (Ternary) button Split a note into three equal, shorter notes Ctrl + S (ternary radio button selected) OR Ctrl + 3
Meld (Ternary) button Combine three equal notes into a single, longer note Ctrl + M (ternary radio button selected) OR Ctrl + Shift + 3
Tie/Untie button Tie two notes having equal pitch Ctrl + T
Enharmonic Equivalent menu Change the way a note is named Ctrl + E
Empty Bar > Add button Add an empty bar to the end of the score Ctrl + Space bar
Chord > Add button Add a chord to the score Ctrl + A
Edit > Save (To Disk) Save score to hard disk F2
Undo button Undo last action Ctrl + Z
Redo button Redo last action Ctrl + Y
Edit > Zoom In Zoom In Ctrl + I
Edit > Zoom Out Zoom Out Ctrl + O
Right mouse button > Paste Paste copied chords or text Ctrl + V

Top


Tool Tips

As the mouse is moved over each of the control buttons or drop menus on the control panel, a text box will appear.This explains the function of the button, and sometimes offers a suggestion of how to apply it.                                

                                                       Full list of control panel Tool Tips:

Button/Menu
Tool Tip
New
Start a new composition
Open (from Disk)
Open a HarmonyBuilder file (with .HAB extension) residing on your local hard drive
Open (from Archive)
Open a HarmonyBuilder file residing on the online public HarmonyHub Archive
Save (to Disk)
Save your composition to your local hard drive
Save As
Save your composition with a different name
Save (to Archive)
Save your composition to the online public HarmonyHub Archive. Note: you cannot delete a composition from the Archive once saved. Should you wish to remove a file, please write to admin@harmonyhub.com.
Print
Open a printable version of the score
Email This Score
E-mail a link to this composition. It will be available on the server for 7 days
Activate an Upgrade
Copy and Paste an Activation key obtained from the "Upgrade to" menu.
Exit
Close application. WARNING! All unsaved work will be lost!
Key
Select Key Signature
Time Sig.
Select Time Signature
Empty Bar > Add
Add one empty bar containing only rests
Chord > Add
Convert 4 rests in the selected location to notes. Select a rest first.
Undo
Undo performed actions (one action per click)
Redo
Redo performed actions (one action per click)
Instrument
Select a different Instrument
Volume
Select Instrument volume
Note
Navigate through single notes
Snapshot
Navigate through single chords
Snapshot (p/w)
Navigate through single chords (part-wise)
Step
Listen to composition one step at a time
Play
Play composition from the selected note
Tempo
Set the Tempo for the composition
Split
Split the selected note in either binary or ternary mode
Meld
Meld the selected note with the next note (binary mode) or next two notes (ternary mode).
N.B. All notes must be of equal pitch and duration
Binary
Set the mode for Split and Meld to Binary
Ternary
Set the mode for Split and Meld to Ternary
Tie/Untie
Tie/Untie the selected note with the next note
Del/Ins
Delete/Insert: convert the selected note to a rest, and vice-versa
Enharm. Equiv.
Change the way the selected note is written
Go To
Jump to the selected bar number
Home
Jump to the first chord in the composition
End
Jump to the last chord in the composition


Top


©2008-2011 Musilogic, Inc.