|
HarmonyBuilder (Educational) is a score editor and composition tool that checks voice leading errors between pairs of notes in chord progressions with up to 4 parts. In moving from one chord to the next, each pair of notes must observe certain rules of motion, which have been developed over the centuries since the Renaissance (1400-1600) and Baroque periods (1600-1760). These rules have become part of the the art of harmony and counterpoint. Here is a list of the basic rules of harmony:
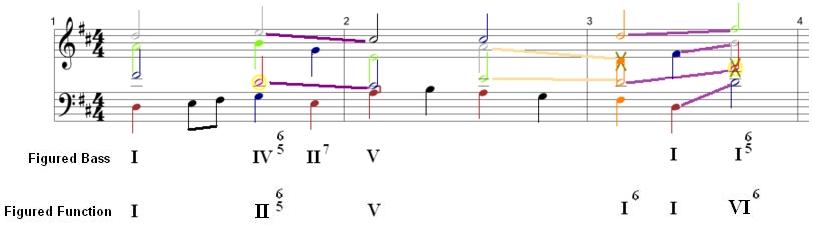
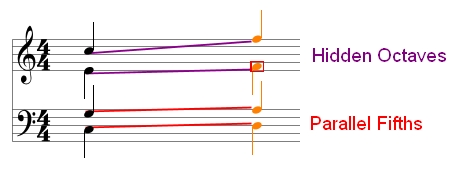
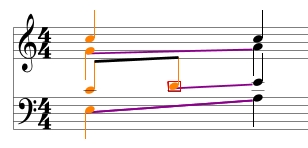
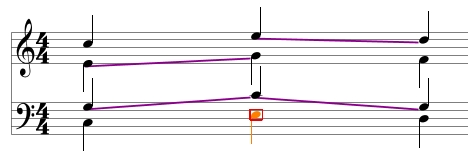
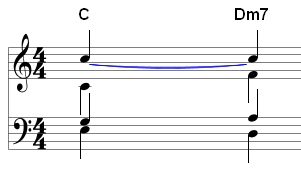
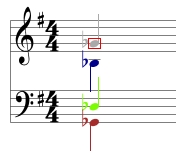
HarmonyBuilder (Educational) will assist the user in understanding and identifying these (and other) errors, and will help correct them in order to write good counterpoint. This is achieved by marking contrapuntal errors with color-coded lines, indicating the presence of voice leading errors. For example, in the illustration below, the red lines indicate the presence of parallel fifths, and the purple lines indicate the presence of hidden octaves:
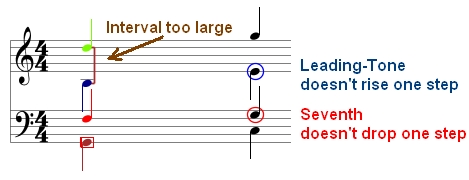
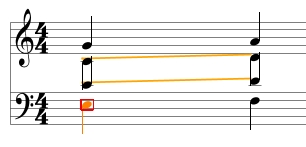
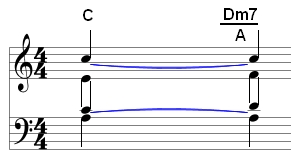
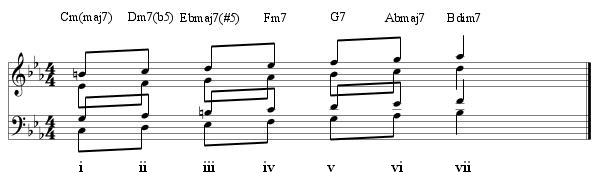
In 4-part harmony, there are 6 pairs of notes within any given chord. HarmonyBuilder (Educational) will check each pair for possible errors, as it moves to the corresponsing pair in the next chord. HarmonyBuilder (Educational) also marks incorrect motion of individual voices, such as sevenths, leading-tones and diminished fifths. It will also indicate when notes move too far apart:
HarmonyBuilder (Educational) also checks for Unison errors, Preparation errors, note range errors, and part overlap errors. With all the automatic checks activated, the user will be assisted in composing polyphonic music with up to 4 parts, with real time warnings when one of the rules is breached. Rules can be activated or deactivated at will. The program will also use a color code to describe the function of each note in any recognized chord. As seen in the image above, the notes of the first chord are colored brown, blue, green and red. These colors correspond to the root, 3rd, 5th and 7th of the chord. Not only does the coloration indicate that the notes are indeed part of a recognized chord, but they also allow the user to quickly recognize the components of the chord, and alter them for richer harmony (such as raising the 5th, or suspending the 3rd with the 4th). A separate panel also names the chord, both in Figured Bass notation as well as standard chord symbol notation. Launch your copy of HarmonyBuilder (Educational) from the Start > Programs index or the Desktop Icon. The canvas will appear with only the treble and bass clefs visible. If the "Key" menu is not active, then go to the File menu and click New. You must now begin entering the necessary parameters for your composition. Please refer to the HarmonyBuilder (Basic) User Manual for instructions on how to use the basic features of the score editor. After inserting the first chord of a new composition, select the Checker panel:
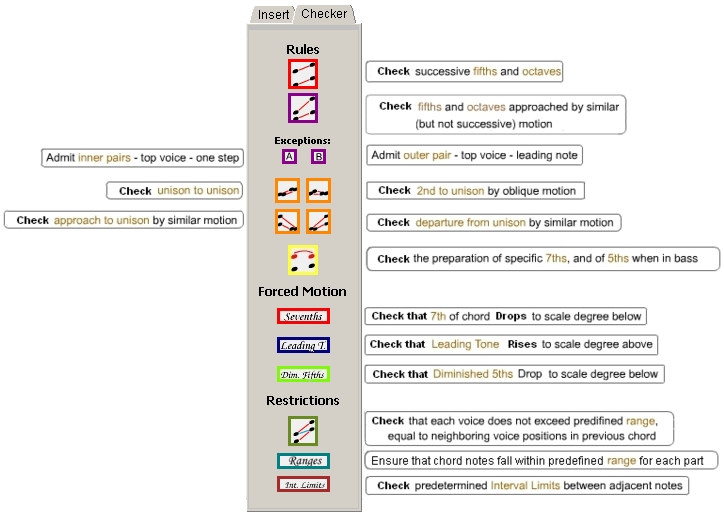
You can activate any of the specific error types that you want to monitor in real time, as you compose. Here is a summary of what each button will activate:
Next, enter chords and nudge notes into different positions to create a composition. To compose a chord progression which has correct voice leading, do the following:
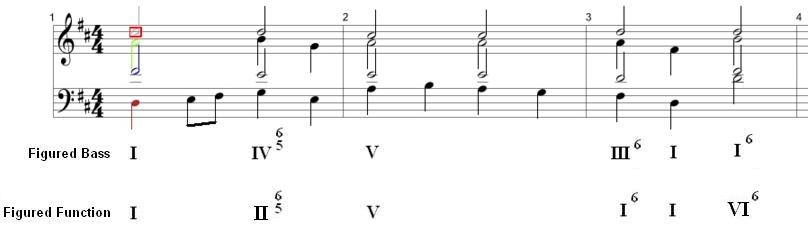
However, be aware that having no voice leading errors within a chord progression does not guarantee a strong harmonic sequence. Refer to the Chord Progression Chooser Tool to construct strong progressions. If passing notes are introduced between two chords, error checking will include the passing note:
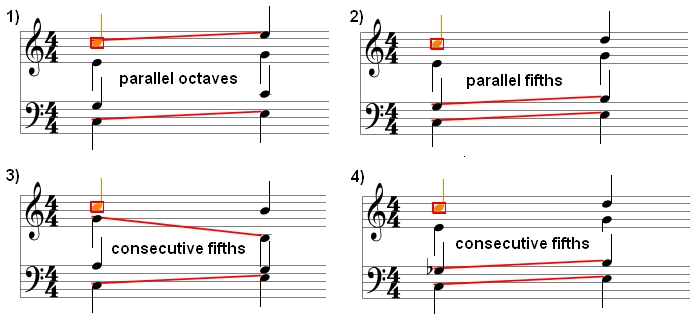
The Checker panel is based on the standard rules of counterpoint. Following is a detailed description of each rule: 1) Check Successive Octaves and Fifths (also known as Parallel, or Consecutive, Octaves and Fifths)
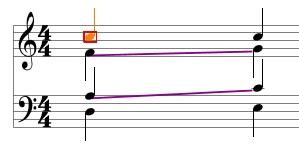
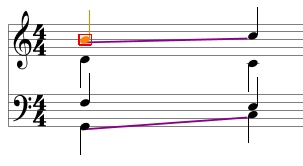
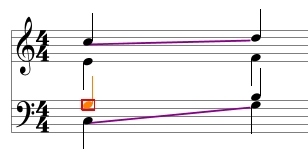
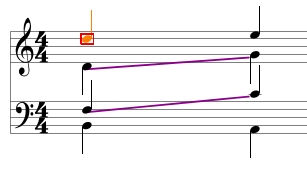
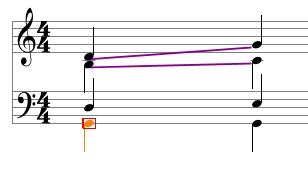
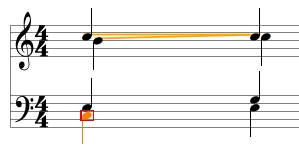
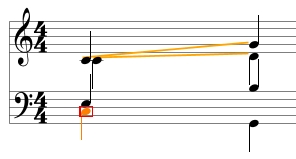
Note that in example 4), the first "fifth" is diminished. Many text books consider this to be an unacceptable transition, so it has been included in the check for consecutive fifths. 2) Check Octaves and Fifths approached by Similar (but not Successive) Motion Otherwise known as "hidden", "direct", "covered", or "exposed" octaves and fifths. This function will mark with purple lines any interval of an octave or fifth when it is not approached by either oblique or contrary motion. It will NOT mark errors from successive motion, which are colored red. This type of error is considered far less critical than consecutive fifths and octaves, and many exceptions have been applied over the centuries. In the present version of HarmonyBuilder (Educational), only two common exceptions (A and B) have been included. It is left to users to correct or disregard the "purple error" markings according to how strict they wishes to be. Below is a list of the main exceptions found in theory books and in common practice:
Any errors of this kind will be maked with orange lines. There are 4 kinds of unison errors:
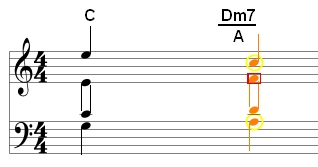
When 7th chords are created, the rules of counterpoint require that the 7th note be "prepared" (with some exceptions, explained later). This means that the 7th must be tied to a note of equal pitch, and of at least the same length, in the previous chord. For example:
This rule has arisen due to the difficulty of intonation of any note in a chord that is dissonant with respect to its other chord members. Since the 7th is very dissonant with the root of a chord, having this note hold over from the previous chord eliminates the difficulty of pitching it in the next chord. An exception has been made for Primary Seventh chords. Since the 7th was originally a passing note between the the root of the chord and its resolution, singers became habituated to pitching the 7th, and therefore it is not required to prepare these 7ths, except in the case of a 7th chord on the VII degree of the major scale in third inversion, when the 7th (which normally does not need to be prepared) must be prepared. The reason is that it forms a dissonant interval with the VII degree note, which is itself a dissonant note within the key. Preparations also pertain to some 5ths. When 7th chords are in second inversion, the 5th (which is now in the bass) must be prepared as well as the 7th (with some exceptions, explained below).
The reason a 5th in the bass of a 7th chord must be prepared is that the interval of a perfect 4th between the bass note and the root of the chord was considered dissonant during the Baroque Era, and therefore difficult to pitch correctly, so a preparation from the previous chord was required. The exceptions to this rule are the following:
Any of the required 7ths or 5ths that are not correctly prepared will be marked with a yellow circle around the note that requires preparation, once the Preparations check button has been selected:
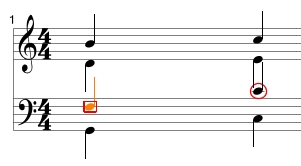
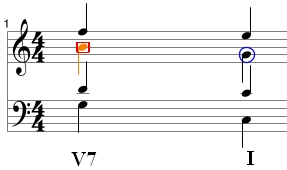
The interval of a 7th is very dissonant, and needs to be resolved. By resolving down one step, it can reach an optimal consonant resolution, usually to a consonant 3rd interval. Resolving the 7th upwards will result in a number of harmonic errors, such as hidden fifths, or 2nd to Unison by Oblique Motion (or Ninth to Octave by Oblique Motion). It has therefore been common practice, for the past two and a half centuries, to resolve the 7th by making it move one step down the diatonic scale. Any note that does not descend diatonically step-wise from a 7th note will be marked with a red circle, if the Sevenths check button is selected. In the example below, the 7th (marked in orange), should descend to an E, so the C has a red circle around it since it is not the correct resolution note:
The Leading Tone (or Leading Note) is the note found on the VII degree of the major or harmonic minor scale. It is found in chords built on the I, III, V and VII degrees of the scale. When this note forms part of an imperfect consonance (3rd or 6th), it will tend to resolve by moving a half step UPWARDS in the passage to the next chord, in which it should form a perfect consonance (unison, octave, perfect 4th or perfect 5th). These conditions do not generally apply to the I7, III or III7 chords. In the case of I7, the leading tone functions more like a 7th, which has a tendency to drop; in the case of the III or III7, the leading tone forms a perfect 5th interval with a lower note in the chord, giving it relative stability. In the examples below, the Leading Tone is colored orange, and resolves correctly:
In the following example, the Leading Tone does NOT resolve correctly, and (when the Leading Tone check button is selected) the incorrectly resolved note will be marked with a blue circle:
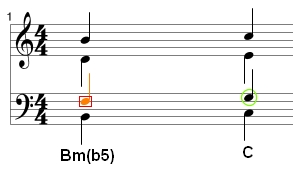
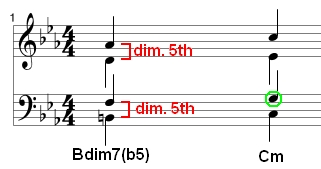
7) Diminished Fifths
The Diminished Fifths checker will mark the incorrectly resolved note with a green circle. In the case of a VII7 chord in a minor key, there are two diminished fifths, as shown in this example:
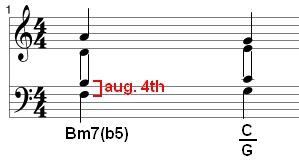
Note also that the inversion of a diminished fifth is an augmented fourth. In this case, there is no requirement for the lower note forming an augmented fourth interval to move in a specific direction. As shown in the example below, both notes forming the augmented 4th can move upwards:
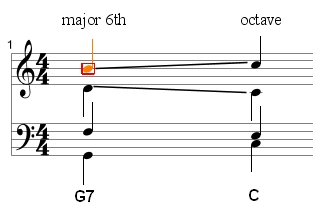
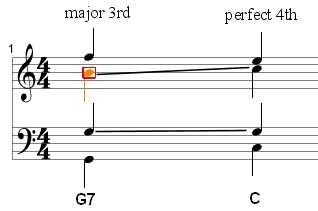
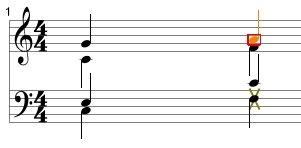
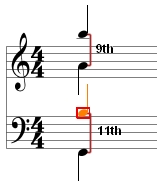
This feature marks with an olive-colored cross any note that moves beyond the neighboring voice position in the previous chord, as shown in the example below:
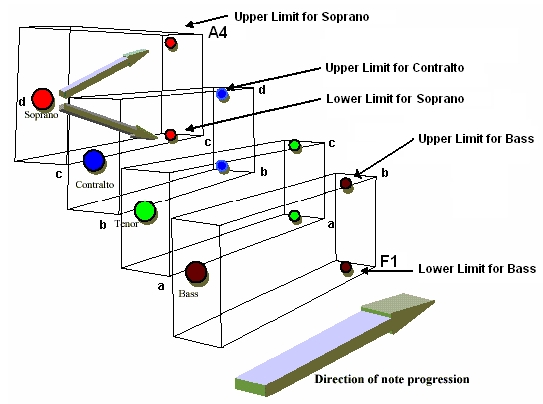
The range limitations imposed by this consideration can be exemplified by the following diagram:
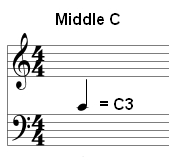
The absolute upper and lower limits are shown as A4 for the soprano, and F1 for the bass, since these are the practical ranges for choral music. Please note that the convention for describing notes in their respective octaves is the alphanumeric system, where middle C is described as C3:
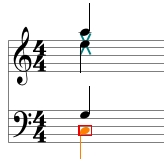
This setting will mark (with a teal-colored cross) all notes that exceed predefined range limits for each part. In the following example, the Alto has moved beyond its range:
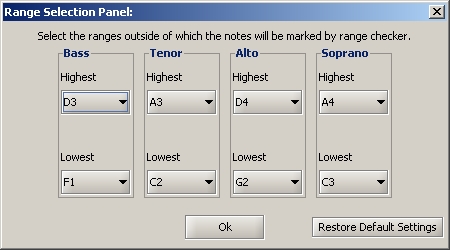
The normal ranges for the Bass, Tenor, Alto and Soprano parts are shown in the default settings of the Range Selection Panel, under the Settings menu. These are considered to be the normal singing ranges for these voices.
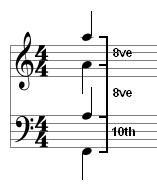
However, it is possible to modify these ranges manually, within the limits of the score editor's notation capabilities. The present version of HarmonyBuilder (Educational) is not designed for the Tenor to go above A3 or the Alto to go below G2. Also, the highest note for the Soprano is C6 and the lowest note for the Bass is C0. The maximum interval between two adjacent notes is set as follows:
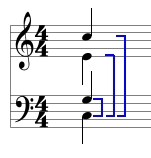
These settings are hard-wired, and cannot be changed. When the Interval Limits button is selected, it will mark (with a brown bracket) the intervals between adjacent notes that exceed the predefined limit. Here is an example of some interval limits being breached:
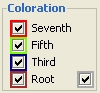
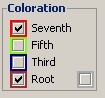
Also, an interval that is less than or equal to a major third between the Bass and Tenor voices will be marked as an error, since the clarity of each note is jeopardized when they move too close together. This is because the overtones start to conflict, producing dissonances rather than consonances. Top The Coloration Panel will become active when either the Snapshot or Snapshot (p/w) radio button is selected. Selecting a snapshot navigation mode will allow the user to hear a chord with whatever note is selected, and each chord can be analyzed. If it falls into one of the standard chord categories, each chord element will be color-coded according to its function in the chord. The following diagram defines the color code:
The recognized chord categories are all the triads and seventh chords found on either the major or harmonic minor scales. For example, all the recognized 7th chords in C major will be the following:
All the recognized 7th chords in C minor will be the following:
More generally, here is a list of all the chord types that will be recognized in any key:
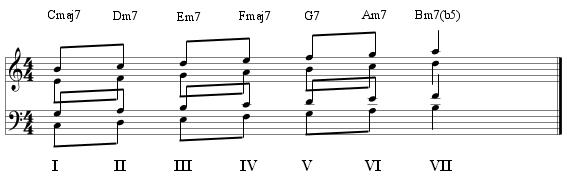
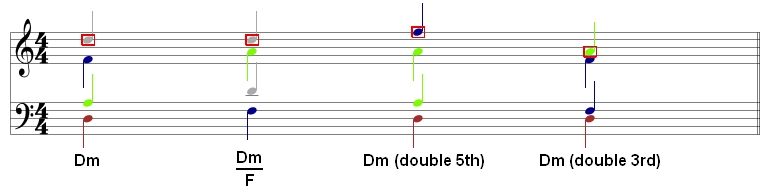
The above chords will be recognized whatever their inversion, note arrangement or note doublings. For example, all these chords will be recognized as Dm:
With regards to doublings, the following combinations will be recognized: Triads:
Sevenths:
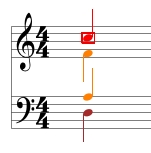
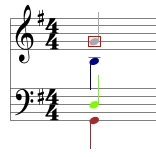
The orange coloration is the default color for indicating that a chord has been selected. Any selected chord that is not recognized as one of the above listed categories will be shown entirely colored as orange. Please note that chords will be recognized even if they are outside the specified Key Signature. So for example, a Gb major chord will be recognized and colored even if the key is G major:
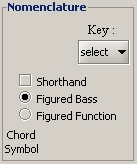
Once a chord has been recognized, it can also be named. The Nomenclature Panel names chords in 2 ways:
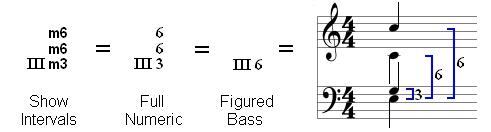
Every 4-note chord, whether recognized or not, can be described by the intervals that exist between the Bass note and the other 3 chord members:
The Nomenclature Panel writes these intervals in detailed format, according to the following abbreviations:
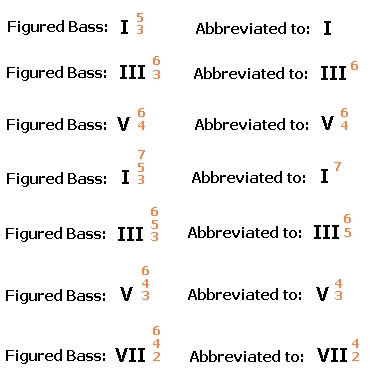
This is the basis of the Figured Bass method for naming chords, which dates back to the Baroque Era. Chords are described by a Roman Numeral which indicates which degree of the scale the Bass note is on, and numbers to the right of the Roman Numeral which descibe the intervals of the other notes above the Bass note. So, for example:
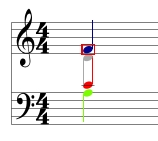
The Roman Numeral III indicates that the Bass note is on the 3rd degree of the C major scale, and the 3 notes above it are a minor 3rd, minor 6th and minor 6th interval above it. The detailed intervals can be abbreviated, first to a "full" format, and then to a "shorthand" format. Any chord that is in the correct position on the scale denoted by the Key Signature will be written in its shorthand format, when the Shorthand checkbox is selected. This is the usual way in which Figured Bass is written by the Baroque Era musicians. The detailed description of the intervals, specifying whether they are diminished, minor, major, perfect or augmented is unnecessary because the notes of the chords remain within the scale of the specified Key, so the quaility of the intervals (d, m, M, P, A, etc. ) is implied. Furthermore, for chords that are in the correct position on the scale denoted by the Key Signature, a further feature is available, called the Figured Function. The Figured Function selection replaces the Roman Numeral representing the position of the Bass note on the scale with the Roman Numeral representing the function of the chord. The function of a chord is determined by the position of the bass note when the chord is in root position. Therefore, selecting Figured Function automatically analyzes an inverted chord, and describes it as though it were in root position. This helps the user perform functional analysis of a chord progression. So, for example, the following chord:
can be visualized in two ways:
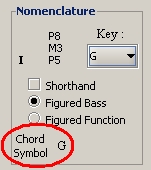
With the Figured Bass selection, the Roman Numeral describes the position of the Bass note on the C major scale. If the recognized chord is in the correct position on the scale denoted by the Key Signature, then the Chord Symbol will appear in the Nomenclature Panel. The following chord:
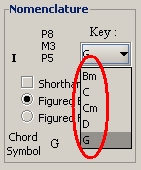
In this example, the Nomenclature Panel will also show all the other keys in which a G major chord is present. Simply open the "Key" drop menu:
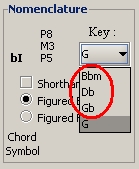
This is useful if you are planning a modulation, and want to see what other keys the selected chord is common to. In cases where a chord is recognized, but is not within the Key denoted by the Key Signature, the Chord Symbol will not appear in the Nomenclature Panel. However, by selecting the "Key" drop menu, all the keys that contain the recognized chord will be listed. For example, the chord Gb is not within the key of G major, but the "Key" menu shows that the chord Gb belongs to the keys of Bbm, Db and Gb. For this chord (in G major)
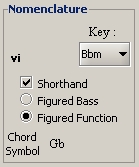
This tells us that the chord is a Gb, found on the VI degree of the Bb minor scale. There are various conventions attached to the use of upper case or lower case Roman Numerals. Usually, lower case is used to imply some form of minor chord. HarmonyBuilder (Educational) uses a different (unorthodox) convention:
In addition to being simple to understand, this system has the added advantage that it tells us instantly whether the key system of the given chord is major or minor. This is not always immediately obvious from a chord symbols, since, for example, an Fm7 belongs to both the keys of Eb major and C minor. By describing it as IIm7, we know instantly that it is a minor 7th chord found on the second degree of a major scale, and by describing it as ivm7, we know instantly that it is a minor 7th chord found on the fourth degree of the harmonic minor scale. This system also makes it easier to differentiate the III degree of a major scale from the iii degree of a minor scale, and the VI degree of a major scale from the vi degree or a minor scale. Top By establishing through the Roman Numeral Convention whether the key is major or minor, there is no need to specify the exact intervals between the Bass note and the upper notes. It is sufficient to specify the combination of 2nds, 3rds, 4ths, 5ths, 6ths, 7ths and 8ves, irrespective of whether they are diminished, minor, major, etc. The scale on which they are built will determine the quality of the intervals. In the interest of simplicity, and to adhere to the common practice of the Baroque Era, the Shorthand notation does not include the interval qualities (d, m, M, etc.), but just the type of interval (2,3,4, etc.). So, for example, Figured Bass vii7 automatically implies a diminished 7 chord, since this is the type of 7th chord that is found on the 7th degree of the harmonic minor scale. Similarly, Figured Bass iii6 automatically implies a minor chord in first inversion, since this is the only type of chord that has intervals of 3 and 6 (6 for short) above a Bass note on the 3rd degree of the minor scale. Here is a chart that shows the abbreviations (or shorthand) used in the practice of Figured Bass:
Applications for HarmonyBuilder (Educational) Below are some of the primary uses for this program, with examples. Students of Harmony and Counterpoint can use this software to carry out their assignments, without touching the piano, pencil or paper. The Checker functions will allow them to explore solutions to the assigned harmony excercise, and find an optimal, error-free progression. Delivery of the score to the students and back to the teacher can be achieved through a variety of ways:
For example, a teacher delivers an assignment to the students, which consists of harmonizing a given bass line:
After opening the exercise in HarmonyBuilder (Educational), each student can experiment with a variety of solutions. The program will mark any errors that occur as notes are added to the score:
By using his or her knowledge of harmony, and using the Checker and Coloration panels as support tools, the student tries to compose an error-free version:
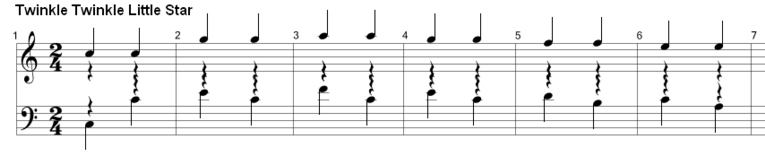
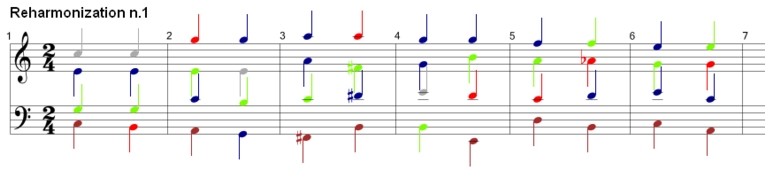
2) Reharmonization of a Melody By nudging the notes under a fixed melody, new harmonies can be found by selecting note positions in which all 4 notes are colored. These chords are all recognized chords, even though they may be extracted from different keys. In this way, a reharmonization can be very interesting and opens the door to infinite possibilities. While reharmonizing a melody, some or all of the error checking buttons may be inserted, in order to optimize the voice leading of the parts. For example, "Twinkle Twinkle Little Star" can be reharmonized in a variety of ways. Here is the basic tune:
By inserting and moving notes, while ensuring that the chords remain colored, and minimizing voice leading errors, we obtain:
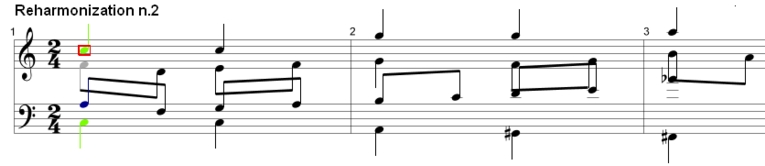
By inserting passing notes, the rhythmic variety of the reharmonization can be enriched:
Even though error checking and coloration are visual aids to reharmonizing a tune, the ultimate judge is the ear, and HarmonyBuilder (Educational) makes it particularly convenient and easy to hear the effect of each note change, in real time, through the use of the Snapshot Navigation modes.
|
.jpg)

 OR
OR 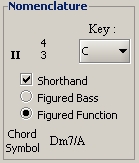
 will be recognized as: