| |
General Description
HarmonyBuilder (Professional) is a score editor and harmonic progression construction tool, incorporating a Builder panel in addition to the functionalities already present in HarmonyBuilder (Basic) and HarmonyBuilder (Educational).
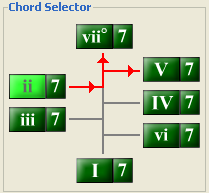
The Builder panel allows the user to choose the “Next Chord” in a composition, using a convenient Chord Selector in combination with other buttons which determine the chord inversion and note doubling. Each button on the wheel corresponds to a scale degree from which a triad or seventh chord is derived. Once a chord wheel button is selected, red arrows will point to the preferable scale degrees from which to derive the “Next Chord”. In the following example, the arrows indicate that the preferable chords after a ii chord are either a V chord or a vii chord:
After selecting a scale degree chord from the Chord Selector panel, the user must specify two other characteristics of the chord:
- Whether it is in Root Position or in an Inversion.
- Which notes should be doubled, if any.
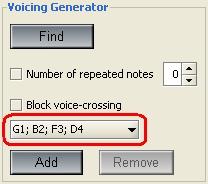
After these parameters have been determined, the user can press the Find button, and the program will list all the possible chord voicings that correspond to the user’s “Next Chord” specification. One of these voicings can then be selected and inserted into the score, using the Add button.
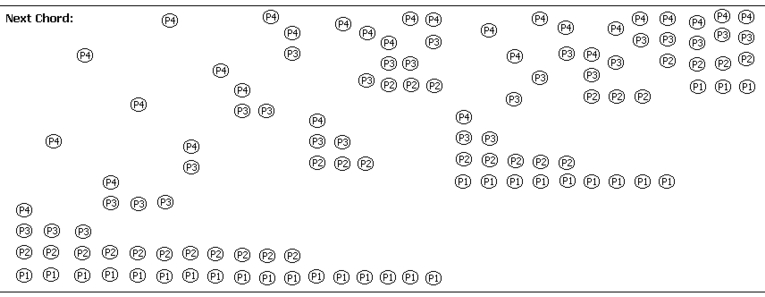
The following diagram illustrates that there are many different ways in which the 4 notes of a chord can be arranged in the score. They can be closely packed at the bottom of the register (far left side of the diagram), or at the top of the register (far right side of the diagram), or distributed in other ways throughout the score:
To facilitate the task of choosing the “Next Chord” from this daunting set of results, HarmonyBuilder (Professional) allows the user to apply numerous “filters” to eliminate many of the chord options that are awkward, impractical, or harmonically incorrect. Filters, such as “Stay within interval limits” or “Prevent successive fifths and octaves”, are inserted by pressing the buttons in the Checker panel. These are the same rules and restrictions that are checked and marked in HarmonyBuilder (Educational) version. However, in the Professional version, the user need not proceed by trial and error, because the program will automatically discard all the chord positions that do not comply with the selected rules. By applying all the rules in the Checker panel, the number of chord choices will be drastically reduced, usually leaving a choice of about 2 or 3 chords. The user can then choose one of these options based on the preferable melody or bass note.
Another option called Set Melody/Set Bass Note allows the user to fix which melody or bass note must be present in the “Next Chord”. By fixing this parameter, the program will list all the chord options that contain the chosen note.
By using the Builder panel combined with the Checker panel to compose chord progressions, the user can focus exclusively on the general chord movement of his composition, or the composition’s melody or bass line, and need not be concerned with making harmonic errors. Chords will always be correctly voiced, and where melody or bass notes are outside of the current key, the program will suggest a list of other keys within which to find suitable chords.
Top
Getting Started
Launch your copy of HarmonyBuilder (Professional) from the Start > Programs index or the Desktop Icon. The canvas will appear with only the treble and bass clefs visible. If the "Key" menu is not active, then go to the File menu and click New. You must now begin entering the necessary parameters for your composition. Please refer to the HarmonyBuilder (Basic) User Manual for instructions on how to use the basic features of the score editor.
After inserting the Key, the Time Signature, one or more empty bars and the first chord of a new composition, move the square cursor to the second beat of the bar. This will be the position of the “Next Chord”.
Warning! The very first chord of the composition must be inserted manually. You cannot use the Builder panel to do this.
You are now ready to start selecting chords using the Builder panel.
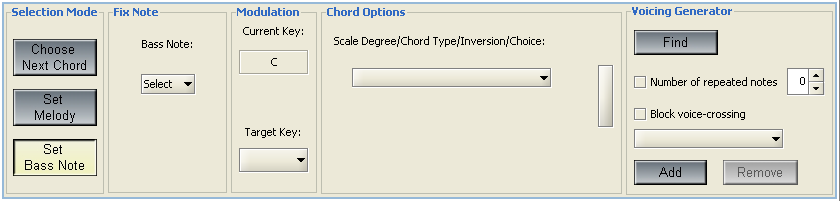
The “Builder” Panel
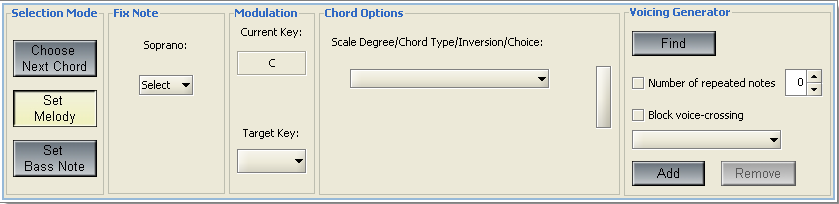
Open the Builder panel, by clicking on the horizontal bar above the score, labeled "Builder" (shown below). Note: this may take a few seconds to load.

Once open, it will look like this:

You must now decide what compositional approach you will use: harmonic, melodic or figured bass.
1) The Harmonic Approach
The Harmonic Approach to composing implies that the composition will be initially conceived as a series of chords, one following from the other, having different durations, and creating rising and falling harmonic tension. A chord progression usually includes one or more modulations from the home Key, which creates further harmonic interest.
For the harmonic approach, start by selecting the Choose Next Chord option. Next, select a Target Key. If you do not wish to modulate, simply select the same key as the Current Key. Next, select whether the “Next Chord” is to be a Triad or a Seventh by selecting one of the 14 buttons in the Chord Selector. You can follow the arrows inside the Chord Selector to help you choose the “Next Chord”. As you click the chord wheel buttons, you will hear what each type of chord sounds like, in the chosen Key. This provides additional aural feedback to help you choose the “Next Chord”.
You must also specify the Inversion of the chord. This will determine whether the bass note will be the Root, 3rd, 5th or 7th of the chord.
Finally, you must specify the Choice of chord. This refers to which notes in the chord will be doubled. Since all chords must contain 4 notes, Triads will necessarily have one doubled note. The preferable note to double is the Root of the chord: to double the Root, the 1st Choice button must be selected. The 2nd Choice button will double the 5th of the Triad; The 3rd Choice button will double the 3rd of the Triad. Only in the case of a I chord will there be a 4th Choice, and this will triple the Root.
Seventh chords only have 2 choices. The 1st Choice will double have no doubling, and the chord will contain a Root, 3rd, 5th and 7th. The 2nd Choice will omit the 5th and double the Root.
To help you visualize which notes are involved with each choice, a visual “note stack” can be observed in the Chord Type panel. This will show which notes are part of the chosen “Next Chord”. For example, a Seventh chord in Root position and 1st Choice will have the following note stack:

This visual aid does not represent the actual relative position of the 4 notes, but simply which notes will be involved in the chord solution. However, the bass note will be correctly indicated at the bottom of the “note stack”, showing what inversion the chord is in.
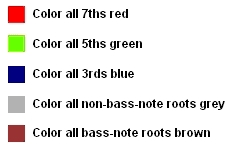
The color convention is as follows:
Once the “Next Chord” has been defined, you can press the Find button to get a list of all the voicings available for that chord. To add one of these solutions to the score, simply select it from the menu and click Add.
Warning! By selecting various Rules and Restrictions from the Checker panel, the number of results can be dramatically reduced. However, in some cases, too many restrictions may eliminate all the results from the “Next Chord” menu. It will then be necessary to either change the chord choice, or reduce the number of restrictions.
Top
2) The Melodic Approach
To create a chord sequence using the Melodic Approach, start by selecting the Set Melody option. You can now develop the harmonic structure by starting from a melodic line.
The Set Melody panel is shown below. Start by selecting the melody note that requires harmonization, from the Soprano menu.
Next, you have two choices.
Either:
Select a specific Target Key for the melody note. This is particularly useful if you want to modulate to another key, or if you want to re-harmonize a standard tune. Once the Target Key has been selected, the Chord Options menu will list all the chords that contain the specified melody note, within the specified Key. Chord options are grouped according to their Scale Degree, Type (Triad or Seventh), Inversion, and Choice. The type of chord chosen from this menu will determine the tension of the harmonization. For instance, a dominant 7th chord will create more tension than a major triad. See the section describing the Chord Wheel.
Or:
Select a Chord Option. You can choose from a complete set of chords, comprising all the inversions and choices of Triads and Sevenths built on every degree of the major and minor scales. Once a selection is made, the visual “note stack” will indicate the notes making up the chord, and the type of bass note. Each chord selection from the Chord Options menu will change the contents of the Target Key menu, by listing only the Keys containing the chord chosen in the Chord Options menu. Once the Target Key is selected, the chord in the Chord Options menu can no longer be changed. Next, by pressing Find, you will obtain all the chord voicings that correspond to the chosen settings.
Warning! The Set Melody mode will almost always find chord options that contain the chosen Soprano note in the top voice, especially if none of the filters are applied. However, due to the fact that the “Disruption of Melodic Line” Restriction is inserted by default when the Builder panel is open, it may happen that a chord voicing with the chosen melody note cannot be found. This will usually happen if the notes in the Previous Chord are very close together. In this circumstance, it is advisable to choose another chord option, or ultimately spread the notes in the Previous Chord farther apart.
3) The Figured Bass Approach
To create a chord sequence using the Figured Bass Approach, start by selecting the Set Bass Note option. This option is ideal if you have been provided with a bass line which you must harmonize. This is a standard exercise in many music schools and conservatories, and is a method of harmonization first developed in the Baroque Era and originally called basso continuo.
You can now develop the harmonic structure by starting from a bass line. The Set Bass Note panel is shown below:
Start by selecting the bass note that requires harmonization, from the Bass Note menu. Next, set the Target Key to be the same as the Current Key, since, in this style of harmonization, a modulation should involve a change of Key Signature, which is made through the Insert Panel. At this point, the Chord Options menu will list all the possible chord choices and inversions for the specified Bass Note.
In order to obtain good voice leading when harmonizing a bass line, all the Rules and Restrictions should be activated. This will reduce the Next Chord options to just a few. You may need to try a number of different chords from the Chord Options menu before you find one that complies with all the rules.
In some cases, none of the chord choices will produce results in the Voicing Generator menu. This means there are no possible voicings for each chord in the Chord Options menu that also comply with the selected Rules and Restrictions. If this occurs, you will have to change the voicing of the “Previous Chord”. This problem usually arises when the notes in the “Previous Chord” are very close together, and the bass note then jumps by a large interval. This allows little room for alternative voicings and inversions of the “Next Chord” without infringing the “Disruption of Melodic Line" Restriction , i.e. “prevent any voice from going beyond neighboring voice position in previous chord”. The remedy is therefore to space the notes the “Previous Chord” more widely, ahead of a large bass note “jump”.
Top
The Chord Wheel
The Chord Wheel is used to explore the different options available in the search for a “Next Chord”. It incorporates two visual prompts which can assist this choice. These are 1) the Routing Arrows, and 2) the Tension Gradient.
1) The Routing Arrows
Inside the Chord Wheel are 14 path maps (or route options) indicating the recommended path options from any given starting chord. Of these 14 route options, 7 correspond to the Triads found on the 7 degrees of the major or harmonic minor scales, and 7 correspond to the Seventh Chords found on the 7 degrees of the major or harmonic minor scales. Once the starting chord has been identified and selected, the choices are indicated by one of the following path maps:
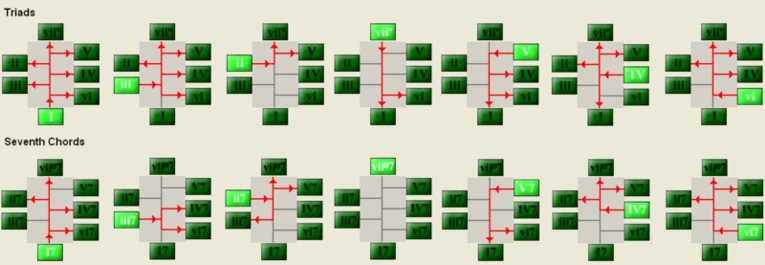
Note: the above Chord Wheel examples contain the Roman Numeral nomenclature for major keys. Minor keys will have a different Roman Numeral nomenclature.
Warning! The above chart does not represent the totality of routing options, because the scenario where the “Previous Chord” is a Triad and the “Next Chord” is a Seventh Chord (or vice versa) is not shown. For example, the routing option for viiø7 going to I is not shown. You can deduce your own route map, according to the following rules:
- When a Seventh Chord goes to a Triad, the Triad must contain the resolution of the 7th. A Triad has three different notes, and each note can be the resolving note of the 7th. Such Triads will be found to be 2, 4 and 6 degrees above the root of the Seventh Chord.
- When a Triad goes to a Seventh Chord, the Seventh Chords on the I, II, III, IV, and VI scale degrees in both major and minor keys, and the third inversion Seventh Chord on the VII scale degree in major keys must all be prepared. Therefore, the preceding Triad must have at least one note that is the same as the 7th on these Seventh Chords. Such Triads will be found to be 3, 5 and 7 degrees above the Root of a Seventh Chord. For further information about the preparation of Seventh Chords, see the HarmonyBuilder (Educational) User Manual > Preparations.
By following the Routing Arrows, as well as the above two rules, you will ensure that you have the greatest number of chord choices while observing the basic Rules and Restrictions of good voice leading.
Top
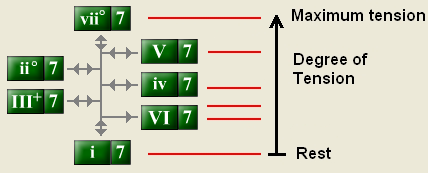
2) The Tension Gradient
The Chord Wheel is designed in such a way that the height of the button above the I button represents the degree of tension introduced by that chord. That is why the Roman Numerals appear to be placed in a random order: the wheel should not be read in a bottom-to-top fashion, rather than a clockwise fashion:
A chord progression should always provide a good balance between tension and release. Here is a graphical representation of a balanced chord progression:
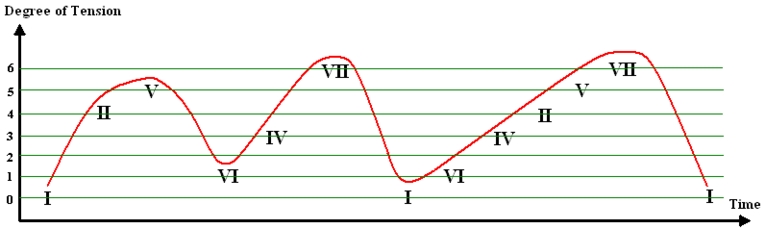
In constructing a chord progression, you will get the best results if you apply the principles of tension and release (by moving up and down the Tension Scale), while at the same time following the Routing Arrows. This will ensure that your chord progression has both harmonic variety and good voice leading.
Top
The “Voicing Generator ” Panel
After the characteristics of the “Next Chord” have been specified in the Builder panel, the Voicing Generator panel is used to generate the results:
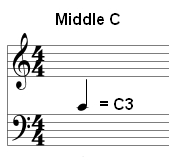
These results are represented as 4 notes, in the following order: Bass; Tenor; Alto; Soprano. This alphanumeric system for naming notes has various versions, depending on what is established as middle C. HarmonyBuilder adopts the following convention:
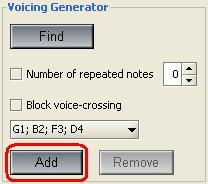
Once a chord has been selected from the results menu, it can be added to any location in the score simply by clicking the Add button:
Warning! A chord can only be added to a location in the score where there are 4 rests of equal value. Unless this condition is present, the Add button will not be active.
After a chord has been added to the score, the Add button becomes inactive, and the Remove button will become active.
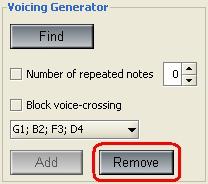
The Remove button can be used to remove any chord in the score as displayed by orange notes when the Snapshot navigation mode is selected.
Warning! This action cannot be undone with the Undo button.
Top
Applying the “Checker” filters
As discussed in the General Description section, there are usually many ways in which the notes in a chord can be arranged (or voiced) in the score. The Checker panel provides a set of Rules and Restrictions, based on the standard rules of counterpoint, which will help to reduce the options to only a few optimal results. Below is an image of the Checker panel, with a description of each rule:
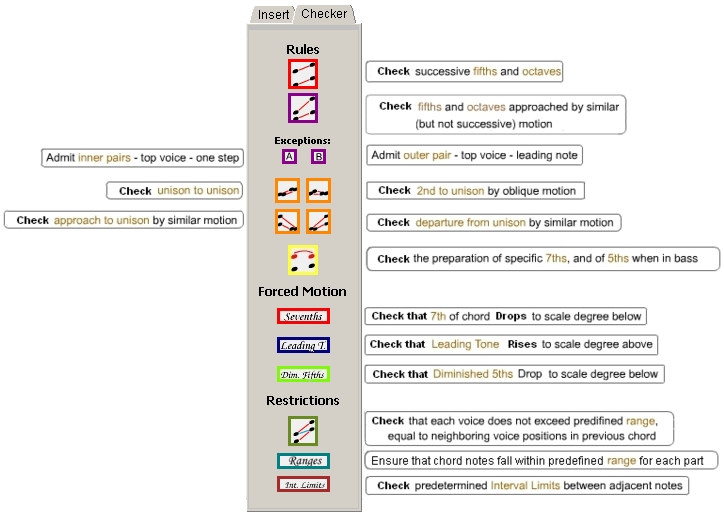
By inserting each of the rule buttons, you will ensure that none of the chord voicings listed in the Next Chord results menu will infringe the selected rule. In other words, chords that infringe the selected rule are eliminated from the results.
For example, let’s start with the default chord in the Key of C major:
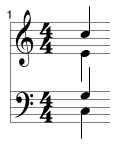
Next, place the square cursor on the “Next Chord” position, i.e. select a rest in the next beat of the score:

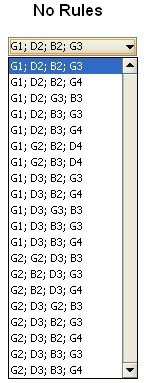
Now, select the Checker panel, but do not select any of the rules. Open the Builder panel, and make the following selections:
Modulation: C
Chord Desciption: V
Chord Type: Triad
Chord Inversion: Root Position
Choice: 1st
Next, click the Find button. The results menu will show 20 chord voicings for the above combination:
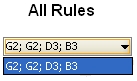
Now, select all possible rules from the Checker panel (including the Exceptions), and press the Find button again. This time, there is only one chord voicing in the results menu! Therefore, there is only one arrangement of notes that will be consistent with all the available rules:
For a detailed description of each of the Checker rules, see the HarmonyBuilder (Educational) User Manual > The Checker Panel.
Top
The “Next Chord” Panel filters
Before clicking the Find button, there are two further filters that can be applied to the results list, to make the choice easier.
1) “Number of repeated notes” filter
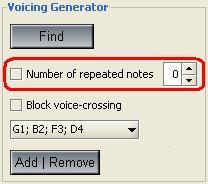
Sometimes it is desirable to ensure that the Next Chord has one or more common notes with the Previous Chord. By activating this feature (by selecting the check-box), you can ensure that the results in the drop menu only contain chords having the specified number of repeated notes.
2) “Block voice-crossing” filter
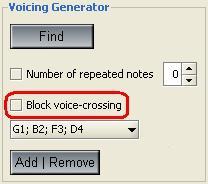
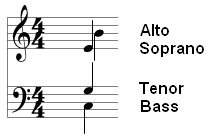
By selecting this option, you will ensure that none of the chords contain notes which have moved above or below any of the other parts in the chord. For example, the chord shown below contains a Soprano note that has moved below the Alto note:
By activating “Block voice-crossing”, cases like this will be eliminated from the results list.
Top
Modulation
When using the Builder panel to "Choose Next Chord”, you must first choose the Target Key. Any of the 13 major or 13 minor Keys can be selected as a Target Key. By default, the Target Key will be set to Auto, which will automatically make the Target Key the same as the Current Key, as determined by the Key Signature of the selected bar. However, the Target Key can be set to any other Key, by selecting Fixed.in the Modulation panel.
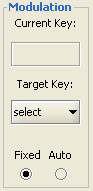
Each Target Key provides a different set of chords, useful for re-harmonization or harmonic variety. Changing the Target Key within a chord sequence need not represent a definitive modulation to a different Key, provided the original Key is re-established afterwards.
For more information of how to modulate from one key to another, according to the well-established rules of harmony, see: http://www.musilogic.com/harmonyhub/elements/functions/key_dep.html
Warning! The Forced Motion filters will not work between two chords in different keys. This is because the detection of the Seventh, Leading Tone and Diminished Fifth is dependent upon the recognition of a specific note within a specific chord, and when the Target Key is changed within the Modulation panel, the specific chord can no longer be identified in the “Previous Chord” with relation to the Current Key. This is reflected in the behavior of the filter buttons: the Leading Tone and Diminished Fifth filter buttons will remain inactive even if the “outside-the-key” chord contains a Leading Tone or Diminished Fifth.
However, the Seventh filter will work between two chords created with the same Target Key. Note, however, that the red circle, indicating an incorrectly resolved seventh, will not work., since this functionality is possible only with chords inside the Key Signature.
To ensure the correct resolution of Diminished Fifths while using Target Keys that differ from the Current Key, it is advisable to enable the Coloration feature, which will identify all 5ths with green coloration. You will then have to establish if the green note represents a diminished fifth (d5), a perfect fifth (P5) or an augmented fifth (A5), since all three will be marked as green.
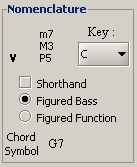
The Nomenclature Panel
Whenever a chord is part of the major or harmonic minor scale, it will always be recognized by the Nomenclature panel, and each note will be appropriately colored by activating the Coloration panel. For a detailed list of recognized chords, please refer to the HarmonyBuilder (Educational) User Manual > Coloration Panel.
When using the Builder panel to compose chord progressions, all the chords in the progression will be part of either major or harmonic minor Key systems, and so will be recognized by the Nomenclature panel. However, once the framework for the composition has been created, with all the correct voice leading, resolutions and range considerations, as well as the various permanent or transitory modulations, individual notes can then be moved to introduce additional musical devices, such as suspensions or alterations.
For example, most 3rds (which will be colored blue) can be raised by one step along the scale to create a suspension. Even though the chord will then no longer be recognized as a standard chord by the Coloration and Nomenclature panels, the new interval structure will be indicated in the Nomenclature panel.
Also, 5ths (which will be colored green) can be altered to create flat 5ths, sharp 5ths or thirteen alterations. Furthermore, Roots can be replaced with suspended 9ths.
All the voice leading rules will still be checked by the Checker panel as these note changes are made.
Applications for HarmonyBuilder (Professional)
Here is a list of some of the ways in which HarmonyBuilder (Professional) can be used to compose music:
- Use the basic score editing functionality (without opening the Checker or Builder panels) to experiment with melodic and harmonic ideas;
- Use the Coloration panel to find chords for a given melody;
- Use the Checker panel to optimize voice leading in moving from one chord to the next;
- Use the Builder > Find Next Chord feature to create consistent and well constructed chord progressions;
- Use the Builder > Set Melody feature to quickly find chord options for a given melody;
- Use the Builder > Set Bass Note option to harmonize a given bass line;
- Use the Nomenclature panel’s “Key” feature to find ways to modulate to new Keys;
- Use the Settings > Create Midi File feature to obtain a Midi file of the composition. Since each of the 4 parts is assigned a different channel, this file can be imported into an orchestral score editor, where the 4 parts can serve as the guide tones for a more orchestrated score;
Top
|
