Version 2.3c
Computer-assisted Music Composition Software
User Manual
Musical composition is the step-by-step process of creating a piece of music. This process involves the skillful manipulation of many elements, from the initial musical idea to the full orchestration and arrangement of the final piece. The starting point for most compositions is establishing the melody, harmony and rhythm, which must be brought together into a coherent whole.
Harmony has developed over the centuries into a formidable art form, and mastering its many possibilities is a long journey. However, much of the theory governing harmony can now be incorporated into software that provides optimal solutions to specific harmonic situations. Composers can provide the basic harmonic or melodic outline, and the software will suggest various chord options and voicings. Because the software automatically applies the fundamental rules of harmony, composers can quickly find the best-sounding harmonizations for their ideas.
HarmonyBuilder is a music composition tool designed to help both professional musicians and serious amateurs apply all the well-established rules of music harmony to achieve aesthetically pleasing compositions.
The program maximizes the ease and speed of composing and editing, while at the same time structuring the score into 4 independent parts. It is ideal for exploring complex harmonies and rhythms, particularly in chorale format, throughout the 26 major and minor keys, and with any combination of binary and ternary rhythms. It employs intuitive controls which can be easily understood, with helpful tool tips for every command on the panel.
This software provides a variety of approaches to the creation of music. For a more intuitive and auditory approach, a special Chord Grid provides a convenient way to explore different chord sounds and insert them into the score with a click of the mouse. For users who prefer to compose by experimenting with different note positions in the score, a convenient Note Edit panel is available, while real time feedback about notes can be obtained from a rule-checking feature called the Checker, as well as from a color-coded system in which notes are colored according to their position in the chord. All chords are analyzed and named in the Nomenclature panel. A more rigorous and theoretical approach can be adopted by using the Builder panel which provides standard pathways for creating a variety of harmonic progressions, as well as a sophisticated melody harmonization tool.
The approaches to composition described above can be used separately or in combination. HarmonyBuilder can be activated according to the user's compositional needs:
| Basic level: compose using the Chord Grid. |
| Educational level: compose using the Chord Grid and Checker Panel. |
| Professional level: compose using a combination of Chord Grid, Checker Panel and Builder Panel. |
Each level introduces a higher degree of automation and background computing into the composition process.
The first step toward using HarmonyBuilder is to download it from www.harmonybuilder.com and to install the Free Trial. All subsequent purchases or upgrades are conducted from inside the running application.
HarmonyBuilder will operate on any system that supports Java, including Windows, Macintosh and Linux.
In order to function, HarmonyBuilder requires the Java Runtime Environment (otherwise known as Java) which must be installed on your computer. This is a free download from www.java.com.
To find out if your computer has Java installed or not, go to
https://www.musilogic.com/harmonyhubforum/checkjava.jsp.
If it is not present, please proceed with the installation of Java. This will also enable the correct functioning of the websites HarmonyDiscuss.com and HarmonyArchive.com.
Soundbank
In rare cases, after installing and launching HarmonyBuilder, the Instrument menus will be empty and you will not hear any sounds. In this case, please write to support@harmonybuilder.com for information on a fix.
| Free Trial |
The free trial of HarmonyBuilder will enable you to test the features of all three versions of the software - Basic, Educational and Professional - for a limited period of time.
The installer for the free trial can be downloaded from www.harmonybuilder.com.
When the trial expires, the program will revert to Demo mode, and most of the advanced functionalities will expire, including the Save features, as indicated by the greyed-out sections of the File menu show below:
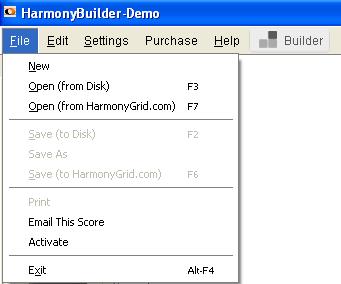
If you wish to re-enable certain features of the program, you must purchase a Unique Activation Key for either the Basic, Educational or Professional version by clicking on the Purchase menu. After receiving the Key via e-mail, paste it into the Activate window accessible from the File menu.
You can compare the features of each version at www.harmonybuilder.com/comparison_chart.html
Please note that parts of this manual refer to specific versions. These sections will be marked with the appropriate version symbols:
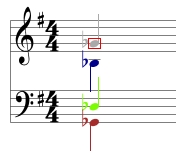
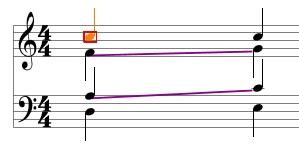
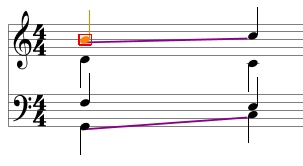
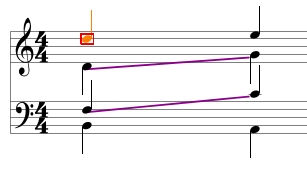
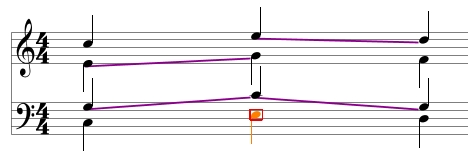
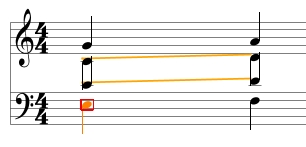
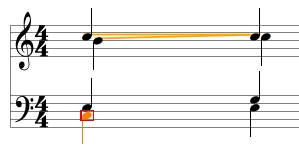
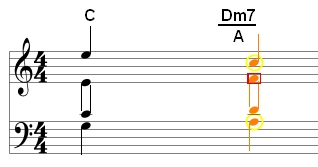
The square cursor is a little red box that encloses a note or rest, making it the target for actions like playback and editing.
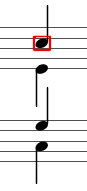
The square cursor is moved around the score either with the Navigation panel or the arrow keys on the computer keyboard.
![]()
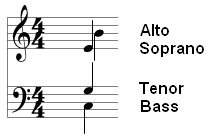
HarmonyBuilder allows for the insertion of 4 independent instrumental parts: Soprano, Alto, Tenor and Bass. Why does it allow no more than 4 parts?
| The Chord Grid |
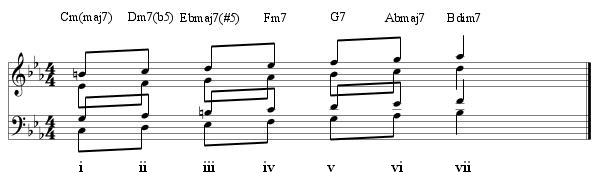
These chords are the complete set of chords found on the major and harmonic minor scales, and are the foundation of all tonal music.
The major scale contains these chords: M, m, dim, M7, m7, 7, m7b5.
This can be seen by exctracting all chord types from the example below:
The harmonic minor scale contains these chords: m, dim, M+, M, mM7, m7b5, M7+, m7, 7, M7, dim7.
This can be seen by exctracting all chord types from the example below:
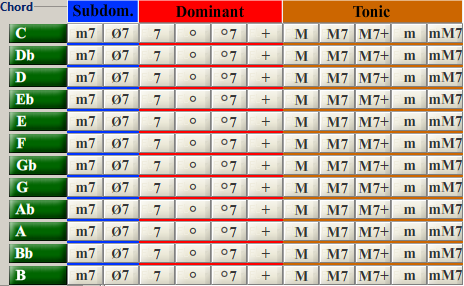
All the above chords are grouped together in 11 columns, and repeated in 12 rows, thus enabling the selection of a specific root for each of the chord types. This is called the Chord Grid:
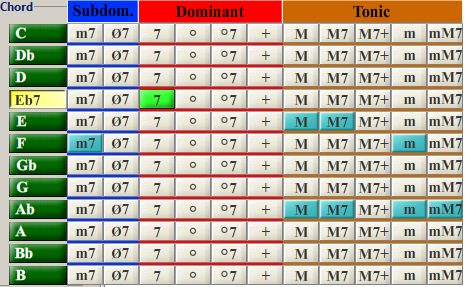
When clicked, each button will play the exact sound of the selected chord, providing essential aural feedback. When the mouse is released over the selected button, the button on the left will turn yellow, and that chord can then be inserted into the score by clicking the Add Chord button:
![]()
or the Delete/Insert Chord button:
.png)
with the From Grid checkbox selected.
If the mouse is released outside (i.e. not over) the selected button, the sound will be heard without changing the chord selection. This allows you to explore various chord options before selecting one.
Once a chord has been selected, a specific set of different chord buttons will become highlighted with a teal color. These buttons are suggestions for possible chords to follow the selected chord, helping you create chord progressions that sound coherent and musical.
Sometimes a suggested chord will imply a modulation, and other times a movement within the key, but in all cases, these are chords that follow naturally, based upon chord routing and the the fact that they coexist inside the same major or harmonic minor scale.
Furthermore, the Chord Grid is divided into 3 sections: Subdominant, Dominant and Tonic. When constructing a chord progression, it is helpful to remember that:
| The Checker |
The Checker allows users to automatically detect the presence of musical errors in a score. The panel contains a set of rules and restrictions which can be turned on or off. Each button has a different color, and if a rule corresponding to a selected button is broken, an error marking will appear on the score with the same color as the button. By selecting or deselecting any combination of rules, a score can be checked for errors in real time, while you compose. If an error is detected, you can either ignore it, or try to eliminate it by rearranging the notes in the score.
A detailed description of all the rules contained in the Checker panel can be found in the section called The Rules.
| The Builder |
 |
 |
Major Scale |
Harmonic Minor Scale |
By selecting a Chord Wheel button in combination with a Chord Inversion button (which determes the chord inversion) and a Choice button (which determines which note is doubled), a set of chord voicings can be generated by the Voicing Generator, as shown in the illustration below:
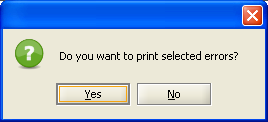
If you select "Yes", then all errors will be included (in color) in the print.
ATTENTION! Printing of checker errors is only available with the Educational and Professional versions.
If you print to PDF format, you can keep a digital document of the errors found in the score, and even send this document by e-mail.
MIDI
When a HarmonyBuilder song is saved to disk as an .HaB file, it automatically creates a second MIDI file. This provides a convenient way to quickly listen to your compositions without opening them in HarmonyBuilder, and also allows you to export your compositions to another score editor.
Creating a Score
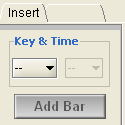
The first step to creating a score is to choose a Key Signature and Time Signature. These parameters are selected from the corresponding menus in the Insert panel, and will adjust the score accordingly.
Key Signature
Choose any one of the 26 major or minor Keys from the drop menu:
![]()
Time Signature
Choose a Time Signature from the following options:
![]()
When notes or chords are added to the score, they will have certain default values, depending on the Time Signature:
The next step is to add an empty bar where notes and chords can be inserted. Each time the Add Bar button is pressed, an additional empty bar will be added to the score.
You are now ready to compose your music.
Compose Harmonically
Choosing an interesting harmonic sequence is the basis of any good composition. Both the Chord Grid or Choose Next Chord panels will assist you in this task.
The simplest and most intuitive way to build a chord progression is using the Chord Grid, as described in the Chord Grid section in this manual. Chords can be auditioned and added to the score with the click of a button.
If you want to ensure that the chords are voiced in
the best possible way, you will need access to the Builder panel (only available in the Professional version). Once a chord has been chosen from the Chord Grid, you can obtain it's Roman Numeral description (Figured Function) from the Nomenclature panel, and then select it in the Builder panel. Apply all the appropriate rules in the Checker panel, then click Find in the Voicing Generator panel, and you will obtain the best voicing for that chord, based on the notes of the previous chord.
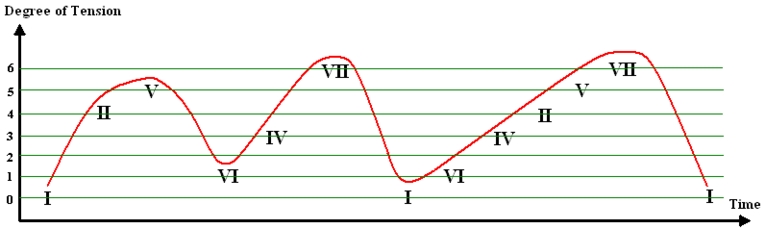
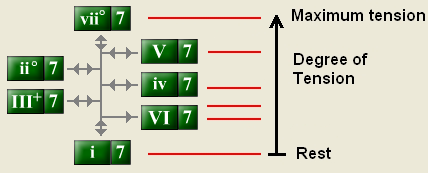
The Tension Gradient
When you compose harmonically, you should remember that a good chord progression should always provide a balance between tension and release. Here is a graphical representation of a balanced chord progression:
| Compose Melodically |
You can also compose a score by starting with a melody line. This means that the soprano note of each chord is fixed. The Builder panel will assist you in harmonizing each given note.
Open the Builder panel and select the Set Melody button. If your melody is already present in the score, the Soprano drop-menu will automatically be populated with the note selected by the square cursor. Next you must select a Target Key. Once this has been chosen, you will see a set of highlighted buttons in the Chord Wheel. These are all the possible chords that contain the chosen melody note.
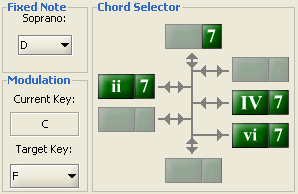
You can audition these chords, select one, and then select an Inversion and Choice, apply any rules in the Checker panel, and then press Find to generate the optimal voicing for the chosen chord. All the generated chords will contain the chosen melody note (though not necessarily in the selected octave).
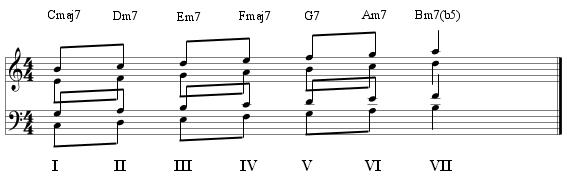
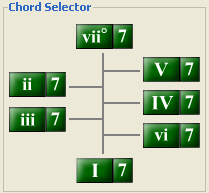
| The Chord Router |
Whether you are composing harmonically or melodically, you should always try to place chords in the correct order. This ensures that tension is affectively built up and released during a chord sequence. For example, ii7 followed by I is not a good progression, because the ii7 has not reached a high enough point of tension before being released. There are also voice-leading considerations that determine if chords progress correctly. For example, the 7th in ii7 should drop a half step in the next chord, but this note is not present in I.
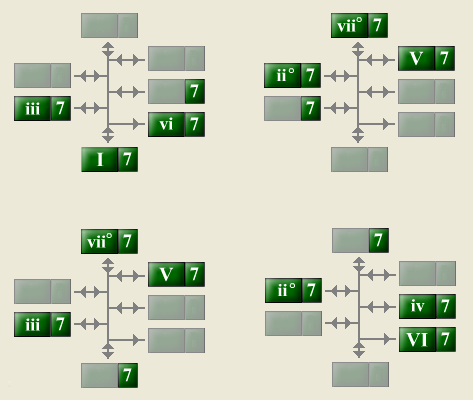
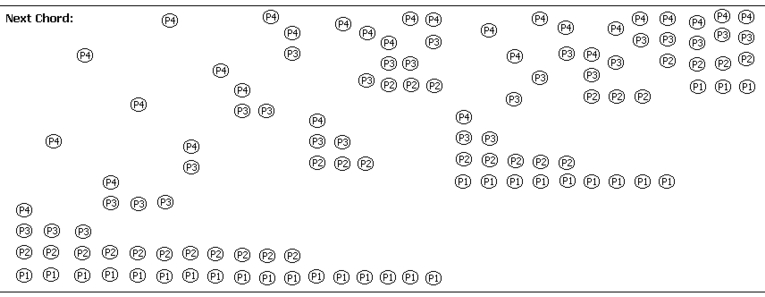
The Chord Wheel contains a tool called the Chord Router which shows which chord options are desirable after a specific chord has been selected. The diagram below shows all the preferable "next chords" that could follow each of the 14 chords present in a major key:
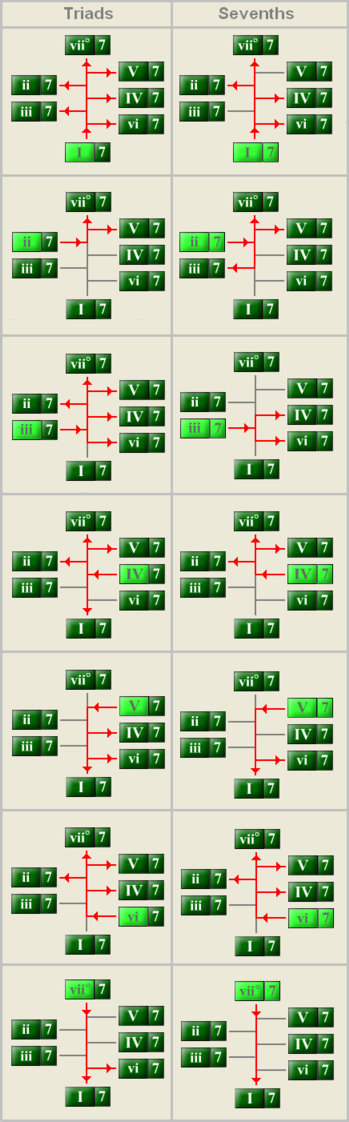
A similar scheme applies to the 14 chords found in minor keys.
In constructing a chord progression, you will get the best results if you apply the principles of tension and release (by moving up and down the Tension Scale), while at the same time following the suggestions in the Chord Router. This will ensure that your chord progression has both harmonic variety and good voice leading.
The most effective way to compose is by using a combination of both the harmonic and melodic approach. In other words, you can first create the overall harmonic structure of the score using the Chord Grid, including any modulations you wish to insert in your piece, and later fashion a melody around the basic harmonies. Subseqeuntly, you can improve the voice-leading by re-voicing the chord notes under the melody notes using the Set Melody panel.
Modulation
Modulation is an important part of composing, because it expands the palette of available chords from 7 (in major keys) or 11 (in minor keys) to about 100, because each chord type can then be transposed to 12 positions on the chromatic scale.
A modulation is considered complete when a new key is firmly established by the presence of the dominant and tonic chords in the new key. When this happens, the Key Signature should be changed, using the Insert panel:
When you compose with HarmonyBuilder, it is advisable to change the Key Signature when modulating because otherwise the program will not apply the three Forced Motion filters, which require the recognition of chords with relation to key. [1]
However, if a modulation is transitory (i.e. only 3 or 4 chords), then it is not practical to change the Key Signature. In this case, the Builder panel provides a convenient way to generate chords outside the Current Key, by using the Modulation panel:
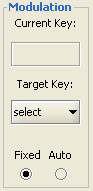
By selecting a Target Key that is different from the Current Key (the key determined by the Key Signature), all the chords in the Chord Wheel will be part of the Target Key, and you can generate chord voicings for the "next chord" inside that Target Key. You can also apply all the Rules and Restrictions from the Checker panel (apart from the Forced Motion filters [1]).
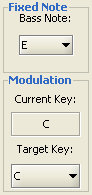
If the Fixed radio button is selected, the Target Key will remain selected whatever Key Signature changes are encountered in the score.
If the Auto radio button is selected, the Target Key will automatically
revert to the Current Key when the square cursor is moved off the selected note. This setting is convenient if you wish to add a single chord that is outside the Key Signature (i.e. a passing chord).
For more information of how to modulate from one key to another, according to the well-established rules of harmony, see: http://www.harmonyhub.com/elements/functions/key_dep.html
The Panels
Insert
The Insert panel is used to insert a Key Signature, Time Signature, one or more empty bars, and default or custom chords.
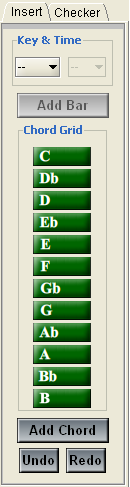
Simply use the drop menus and buttons to start your score. The parameters must be selected in the following order:
1) Key Signature
2) Time Signature
3) Add Bar or bars
4) Add Chord
When you press Add Bar to add the first bar of a composition, a pop-up will ask “Do you want to add Pick-Up Bar?”. You can choose to add a bar numbered '0' before the first bar of the composition:

Each time you press Add Bar, an extra bar is added to the composition.
When you mouse over the green buttons, the Chord Grid will open. You can select any chord, and this chord will then be added to the score when you press the Add Chord button.
If a chord is already in the place where a chord is being added, the first click of the Add Chord button will delete the existing chord. If a chord is deleted by mistake, the Undo button can be used to undo the deletion.
You can add a default chord to the score at any time, by pressing the Delete/Insert Chord button in the Note Edit panel, with From Grid unchecked:
.PNG)
or by pressing the keyboard shortcut: Ctrl + Shift + A.
This chord will always be the Tonic chord in the key of the selected bar.
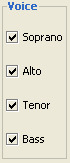
Voice
The Voice panel is used to select or deselect each of the four voices of a composition. In this way some voices can be muted, and just the specified parts of a composition can be heard.
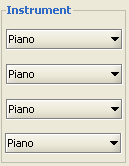
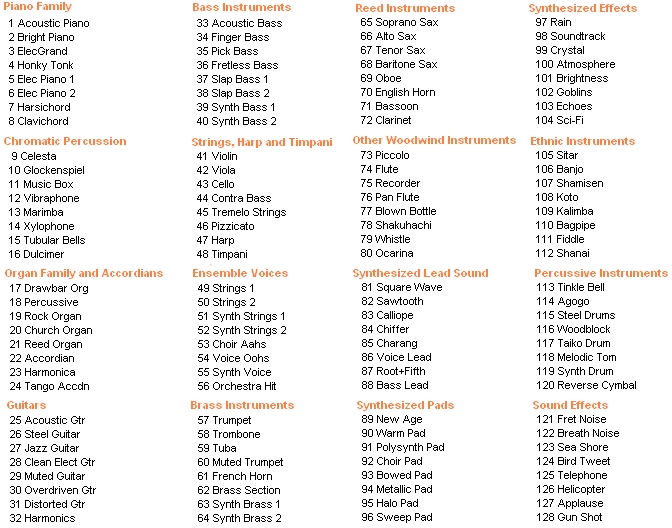
The sounds for each part in the Instrument panel are provided by a General Midi soundbank which, in some cases, must be installed after Java has been installed on your computer. See Soundbank. While all the instruments are displayed in a single menu, they are in fact part of specific instrument groups, as seen in the chart below:
Play
Playback of the score can be started by pressing the Play button. The score will play from the place where the square cursor is positioned. You can quickly jump to different playback start positions by using the Go To menu in the Navigation panel.
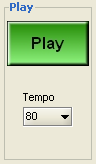
The Tempo can also be changed in this panel, in a range from 30 - 240 bpm (beats per minute).
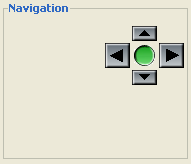
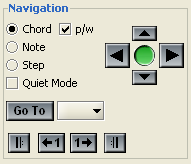
Navigation
The Navigation panel is used to move the square cursor through all the notes and rests in the score, and to jump quickly to different places in the score.
Following is a detailed description of each section:
 |
The Navigation Arrows are used to move the square cursor to adjacent notes, either above, below, to the left or the right. The Green Button in the middle of the Navigation Arrows can be used at any time to hear the selected note or chord. |
|
| The Go To menu can be used to jump to any selected bar. |
The 4 Rapid Navigation buttons have the following functions:
| Jump to first bar | ||
| Jump back 1 bar | ||
| Jump forward 1 bar | ||
| Jump to last bar |
There are 4 modes of navigation through the score, which can be selected in the Navigation panel:
 |
p/w = part-wise |
|
|
|
|
|
|
|
|
![]()
| If you select Quiet Mode, all the Instrument volumes will be set to zero. You can then audition the selected chord by pressing the Green Button or the keyboard Spacebar. This allows you to compose in silence, and hear only what you choose. | ||

Following is a description of each section:
| The Nudge arrows allow you to move notes up or down the chromatic scale, one note per click. You can hold the button down for rapid position change. [8] Keyboard shortcut: Shift + up/down arrow keys |
||
| Make selected note or rest shorter | ||
| Make selected note or rest longer | ||
 |
Delete or insert a note. If a rest is selected, it will be converted to a note, and if a note is selected, it will be converted to a rest. |
| Use either the pop-out panel or the computer keyboard to enter notes in the score. Pressing the button/key twice will change the octave of the inserted note. |
 |
Delete or insert a chord. If a rest is selected, it will be converted to a chord, and if a note is selected, it will be converted to 4 rests. If From Grid is unselected, the default chord will be entered when Chord is pressed. This is always the tonic chord of the prevailing Key. If From Grid is selected, the chord highlighterd in the Chord Grid will be entered. |
|
| Use the Rename drop menu to rename a note enharmonically. You can also cycle through the different note names by pressing Ctrl + E repeatedly. |
||
| Use the Tied Note button to add or remove a tie between two notes that are side by side and of equal pitch. | ||
| Use the Triplet > Yes or Triplet > No buttons to change a note into a triplet, or change a triplet back into a single note. [7] |
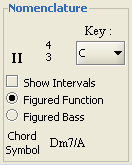
Nomenclature
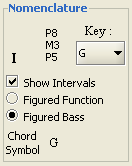
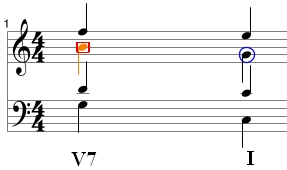
The Nomenclature panel provides information about the selected chord:
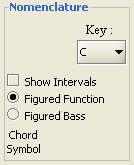
If the selected chord is a member of the Chord Grid, the Nomenclature panel will describe the chord in 3 ways:
How chords are named
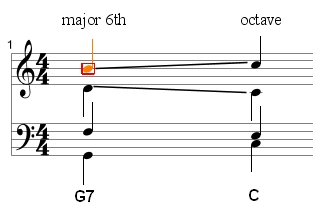
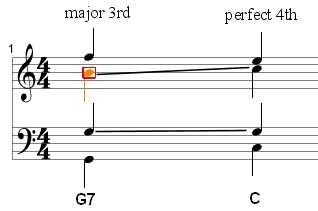
Every 4-note chord can be described by the intervals that exist between the Bass note and the other 3 chord members:
If Show Intervals is selected, the Nomenclature panel will show the exact intervals between the bass note and the upper 3 voices. Intervals are described with the following abbreviations:
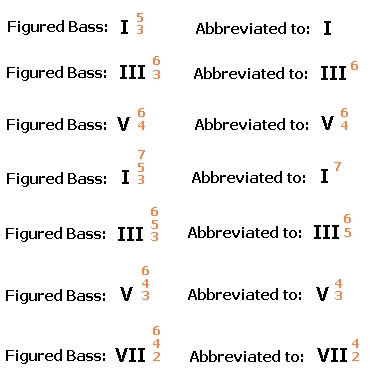
This is the basis of the Figured Bass method for naming chords, which dates back to the Baroque Era. Chords are described by a Roman Numeral which indicates which degree of the scale the Bass note is on, and numbers to the right of the Roman Numeral which descibe the intervals of the other notes above the Bass note.
For example:
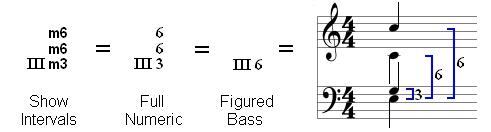
The Roman Numeral III indicates that the Bass note is on the 3rd degree of the C major scale, and the 3 notes above it are a minor 3rd, minor 6th and minor 6th interval above it. The detailed intervals can be abbreviated first to a "full numeric" format, and then to the Figured Bass format.
The detailed description of the intervals, specifying whether they are diminished, minor, major, perfect or augmented is optional, because if the notes of a chord remain within the scale of the specified Key, the quaility of the intervals (d, m, M, P, A, etc. ) is implied [3].
Figued Function: If the Figured Function radio button is selected, the chord's function inside the specified Key will be shown.
will be represented in the following way:
|
|
| Figured Bass: If the Figured Bass radio button is selected, the Roman Numeral will always describe the position of the bass note inside the speciefied Key. This closely resembles the Baroque Era mothodology, where the interval numbers make reference to the written bass note, and not to the chord's function. | |
Chord Symbols: If the selected chord is a part of the specified Key, then the modern notation Chord Symbol will appear at the bottom of the Nomenclature panel. The following chord:
|
Key Menu
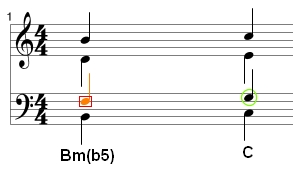
If a chord is part of the Chord Grid, a list of other keys that the selected chord belongs to will be shown in the Key menu, and by selecting one of them, a Roman Numeral will appear, indicating the chord's function in the selected Key.
For example:
A G major chord in the key of G is represented by Roman Numeral I, and Chord Symbol G.
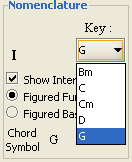
However, the Key menu shows that a G major chord is also present in other Keys. By selecting these keys, we can see that G major is:
If a chord is part of the Chord Grid, but no Chord Symbol appears in the Nomenclature panel, this means that the chord is not part of current Key, as determined by the Key Signature.
For example:
A Gb chord is not within the key of G major, but the Key menu shows that the chord Gb belongs to the keys of Bbm, Db and Gb.
 will be recognized as:
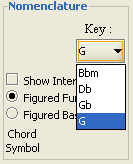
Chord Recognition
A chord will be recognized and named by Figured Function and Chord Symbol only if it is a triad or seventh chord found on either a major or harmonic minor scale. In other words, it must be included in the Chord Grid. Otherwise, it will only be described by its note intervals above the given bass note.
Here is a list of all the chord types that will be recognized:
The above chords will be recognized whatever the Key Signature, inversion, note arrangement or note doublings.
For example, the following chords will all be recognized as Dm:
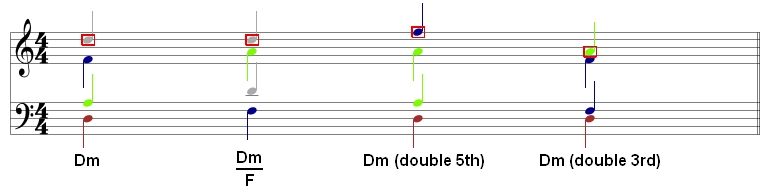
With regards to doublings, the following combinations will be recognized:
Triads:
Sevenths:
Roman Numeral Convention
The Nomenclature panel uses a customized Roman Numeral convention to specify if a chord is part of the major or harmonic minor scale [2].
Coloration
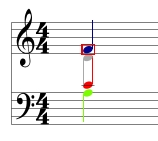
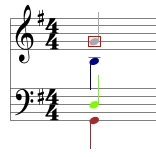
Coloration is a note identification system base on 5 colors that allows you to quickly identify the chord elements of a chord.
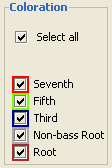
When the program is launched, all the Coloration panel checkboxes are selected by default. This means that every chord that is entered from the Chord Grid or the Builder panel will have colored notes, according to the following color scheme:
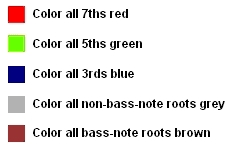
This will make it very easy to recognize chord elements like the root or the seventh, and it also makes it easy to see an inversion, which will have either a blue, green or red note on the bottom.
The Coloration panel will only be active if the Chord mode of navigation is selected, since neither the Note or Step modes take into consideration complete chords during navigation.
The coloration check boxes can be selected or deselected so as to highlight specific chord elements in the score.
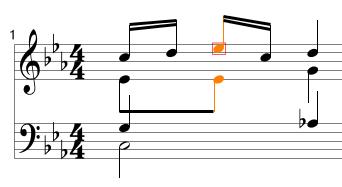
If notes are moved such that a chord is no longer a member of the Chord Grid, coloration will be lost, and all the notes will become orange.
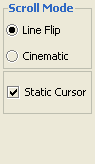
Scroll Mode
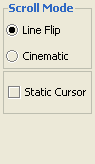
When the Play button is pressed, the score will scroll in one of two ways: Line Flip or Cinematic, depending on the radio button selection This selection will also determne the way the score moves when navigating through the score with the arrow buttons (or keys).
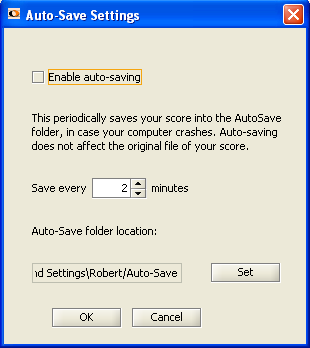
Auto Save allows you to create a backup copy of your work, in a separate folder, at regular time intervals.
To enable Auto Save, go to Settings > Auto-Save, and check the Enable auto-saving check box.
The default location of the "autosaved_backup.HAB" file is shown in the Auto-Save Settings panel (see image below). This can be re-set to another location, if desired. The backup file does NOT overwrite the file saved manually by the user using the File > Save (To Disk) menu.
The time interval when auto-save is performed can be changed manually. By default, it is every 2 minutes.
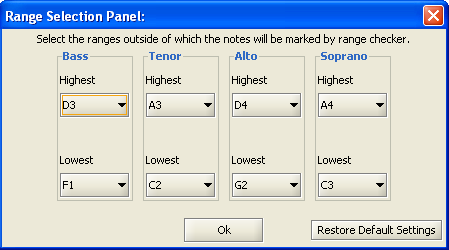
| Range Selection |
The Range Selection panel is used to set the range boundaries that are considered when the Checker > Range button is selected. Notes that surpass these boundaries will be marked with a cross.
The panel will open with the default ranges for each part. These are the normal ranges for the Bass, Tenor, Alto and Soprano parts, but the ranges can be adjusted, within the limits shown below:
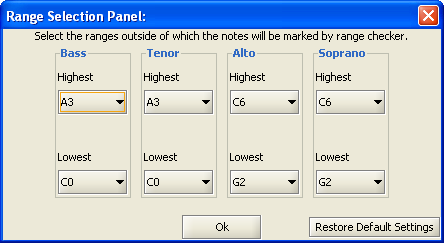
ATTENTION! The Voicing Generator will not include results for ranges that exceed the default ranges. This is because the purpose of the Voicing Generator is to suggest optimal results, and notes that are higher or lower than the standard vocal range are considered unnecessary options.
The Voicing Generator will take into account ranges that have been restricted with respect to the default ranges.
| The Checker Panel |
When the Checker panel is opened, no rules are selected. When you select a rule, two things will happen:
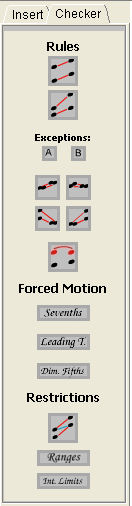
A detailed description of each rule is in the Rules chapter of this manual.
| The Builder Panel |
Open the Builder panel by clicking on the Builder menu button.
![]()
The Builder panel contains the section of the program that allows you to generate multiple chord voicings for a specific chord of your choice.
Voicing options can be reduced by applying Rules and Restrictions from the Checker panel.
The more rules and restrictions are applied, the smaller the set of generated voicings. This allows the user to find the best possible voicing for each subsequent chord.
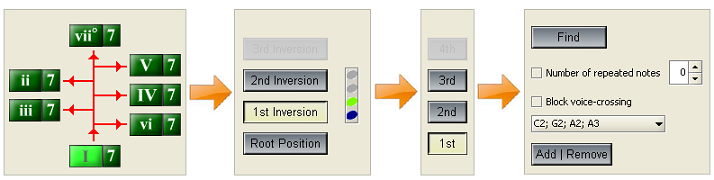
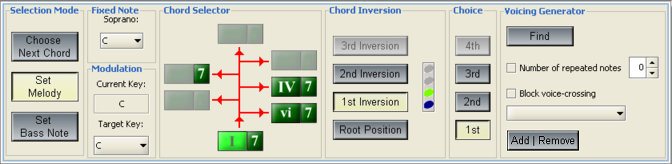
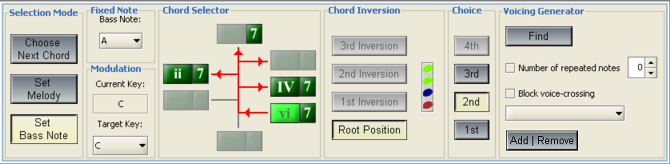
Choose a Selection Mode to determine how you want to select a chord for the score:
This selection allows you to choose any chord from any key, in any inversion, and find the optimal voicing for it before adding it to the score.
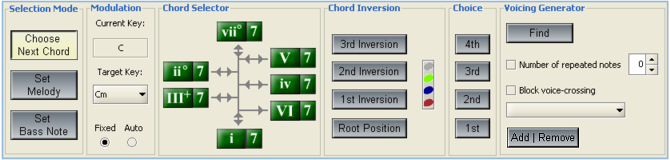
After selecting this option for generating a chord, you must specify the Target Key. Unless you wish to modulate, this should be the same as the Current Key, as displayed in the Modulation panel:
By default, the selected Target Key will remain the same even if the Current Key changes. However, you can have the Target Key change automatically to match the Current Key by selecting Auto. For more information on these two radio buttons, see section on Modulation.
Next, use the Chord Wheel in the Chord Selector panel to choose the chord function of the chord you wish to generate:
Use the Chord Router to help you formulate a good chord progression plan.
Next, specify the Inversion. This will determine whether the bass note is the Root, 3rd, 5th or 7th of the chord.
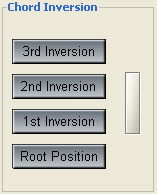
Next, specify the Chord Choice.
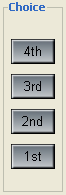
This refers to which notes in the chord will be doubled. Since all chords must contain 4 notes, Triads will necessarily have one doubled note. Each choice button corresponds to a specific note doubling scheme:
To help you remember which notes are doubled for each chord Choice, look at the note stack to the right of the Inversion buttons. This shows which note is in the bass, and which notes are doubled, according to the Coloration code.
For example, in this arrangement, the 3rd is in the bass (i.e. the chord is in 1st Inversion), and the 5th is doubled:
![]()
Usually, the most preferable note to double is the Root of the chord, and the least preferable note to double is the 3rd. The exception to this rule is when a Triad is in 2nd Inversion. In this case, the 1st and 2nd choices are switched, and the 5th becomes the most preferable note to double.
A triple root is generally used in an Authentic Cadence, for the final chord of the composition.
You will often have to use less desirable choices in order to comply with voice-leading constraints.
Next, you can use the Voicing Generator panel to list all the possible voicings of the specific chord you selected.
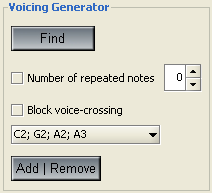
Usually, this will be a very large set of chords, since there are many ways in which 4 notes can be arranged on a staff in the range F1 - A4. [4]
For example, a V chord in root position will generate a set of voicings that looks something like this:

At this stage it is advisable to reduce the number of results by applying filters from the Checker panel. You can apply any combination of Rules and Restrictions that you wish. Simply select the buttons from the Checker panel, and re-press Find in the Voicing Generator panel.
The most effective filter is the Red Rule (Prevent consecutive fifths and octaves), and this alone will reduce the results by about 60%. The next most effective filter is the Interval Limits filter (Ensure that intervals between adjacent notes do not exceed predefined limits) which will reduce results by about 50%. When combined, these two filters can reduce results by about 85%. Since these two rules are very important for composing pleasing harmony, it is advisable to keep them selected all the time.
For example, after applying the Red Rule and Interval Limits filter to a I - V progression, the Voicing Generator will produce the following set of voicings:
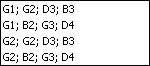
These four choices give you the option of moving the melody note down to B3 or up to D4, and the bass note down to G1 or up to G2. These are important considerations when constructing a chord sequence, since they determine the contour of the melody and bass line.
The following diagram shows the 4 voicing options for the V chord in the above example:
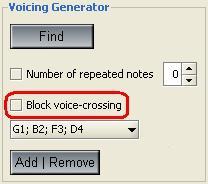
In general, it can be said that it is always better for the soprano and bass notes to move in contrary motion, and also to avoid intervals of a 3rd or less between the bass and tenor. This would mean that the best choice is N. 2.
Once a chord has been selected from the drop menu, it can be added to the score using the Add | Remove button. If a chord is already in the chosen position, it will be removed when the button is pressed the first time, and the chosen chord will be added when the button is pressed the second time.
ATTENTION: In some positions of the square cursor, the Add | Remove button will become inactive. This is because chords can only be added to a position that contains 4 notes or rests (or a mixture of the two). Here are 4 examples showing cases in which chords can or can't be added to the score:
ATTENTION: The Builder panel will only generate chord voicings if the square cursor is placed directly to the right of a complete 4-note chord, known as the "Previous Chord". The reason for this is that the "Next Chord" is affected by the position of the notes in the "Previous Chord" by the Overlapping Restriction which is compulsory when using the Builder panel.
Set Melody
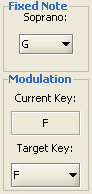
If a composition starts with a melody line to which harmonies must be fitted, then the Set Melody panel is a powerful tool. It can also be used to re-harmonize an existing harmonization, by providing a wide array of chord options for a given soprano note.
Select the soprano note in the score with the square cursor. This will automatically enter the correct note in the Soprano drop-menu in the Fixed Note panel. Alternatively, you can manually select a different note from the drop-menu.
Once a melody note has been selected with the square cursor, you will be presented with active buttons that correspond to all the chords that contain the selected melody note. Select one of these chords.
Next, you must choose an Inversion and Choice. Notice that some inversions and choices are not available, because they would not allow the selected melody note to be in the Soprano part.
Next, press the Find button in the Voicing Generator panel to generate all the available voicings. Each one of these voicings will contain the chosen melody note in the soprano position.
You can use the Checker panel to filter out many of the voicing options, leaving you with a small set of optimal voicings.
Below is an image of what the Set Melody panel looks like with melody = C, Current Key = C and Target Key = C (i.e. no modulation):
Note:
By default, the Target Key is pre-selected to be the same as the Current Key. However, if you wish to modulate, you can change the Target Key. The drop-menu will list between 14 and 16 Targets Keys that all contain the selected Soprano note.
If the selected melody note is NOT contained in the Current Key, then the Target Key menu will remain blank, and you will have to choose from the list of alternative keys that all contain the chosen melody note.
For example, here are 4 combinations of chords generated by different Target Keys, all containing the same melody note:
You can audition each chord by clicking on the green chord button. You will hear that every one of these chords contains the selected melody note.
If you have a bass line, and wish to construct harmonies over it, then the Set Bass Note panel is a powerful tool for determining the best chord to construct on any given bass note.
First, select the bass note with the square cursor.
You will see that the Target Key is pre-selected in the Fixed Note panel, unless the bass note is not contained in the Current Key.
You can change the Target Key if you want to modulate.
Next, select the three chord parameters (Chord Selector, Chord Inversion and Choice). After pressing Find, the Voicing Generator will list all the chord voicings that contain the chosen bass note.
Below is an image of what the Set Bass Note panel looks like with bass note= A, Current Key = C and Target Key = C (i.e. no modulation):
ATTENTION! In some cases, you may not be able to generate any chord voicings for a chosen melody or bass note, even though an active combination of buttons is selected. This could happen if the "previous chord" is in very close position, i.e. the chord notes are close together. Since the Overlapping Restriction is mandatory in the Builder panel, it may be impossible to find a note combination which accomodates the chosen melody or bass note without overlapping parts. In this case, you should experiment with different inversions of the "next chord" (in the case of Set Bass Note), or create a wider voicing for the "previous chord", or even consider changing your "next chord".
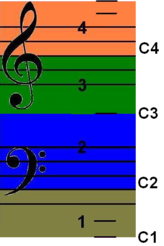
Octave Notation
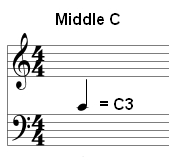
Voicings are described in the standard keyboard notation, where C3 = middle C on the piano keyboard.
The following diagram shows how the octaves are numbered:
Tools
The Text Tool
Enable the Text Tool by checking the box under Settings > Enable Text Tool. A text box can now be opened by double-clicking the desired location in the score. Type some text into the text box. By clicking the mouse again (anywhere), the text will be committed to the canvas.
Text can be dragged to different locations by clicking once on the text when the "hand" appears. This will make a little red arrow appear to the left of the text. The text is now enabled for "clicking & dragging". Click away from the text to disable "click & drag".
To further edit text that is already committed to the canvas, double-click on the text when the "hand" appears. This will open a Text Editor in the top-left corner of the screen. This will enable re-typing, as well as changing the font, size and type face.
To delete text, click on the text to make a little red arrow appear to the left of the text, then press the Delete key on your keyboard.
ATTENTION! The Text Tool will only function at the default zoom level, i.e Level 3 = Normal.
WARNING! When dragging text from one place to another, always use the Navigation Panel (or arrow keys) to move the square cursor to the new location. Do NOT use the Play button, since this will change the coordinates of the selected text position, and the text will "jump" to a different location when you try to drag it. This will be especially evident if you try to select and drag text after having used the Play button. You must always reposition the square cursor BEFORE dragging the text.
The Line Tool
Enable the Line Tool by checking the box under Settings > Enable Line Tool. You can then draw straight lines across any portion of the canvas, by clicking & dragging. Once a line has been drawn, you can select it by clicking on it when the "hand" appears (a little red arrow appears at one end of the line), and drag it by clicking again and dragging to the desired position.
To delete a line, click on the line to make a little red arrow appear at one end of the line, then press the Delete key on your keyboard.
ATTENTION! The Line Tool only functions correctly at Level 3 (Normal) zoom.
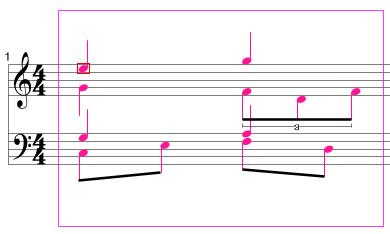
Copy & Paste Chords
You can copy as many chords as you wish, and then paste them into another location. To select the chords you want to copy, do the following:
For Windows: press the Ctrl key + left mouse button, and drag the mouse over the relevant chords. This will enclose them in a pink box, and the selected notes will turn pink:
For Macintosh: press Control + mouse button. This will make the following icon pop up on the screen:
![]()
This indicates that the drag-selection feature is enabled. Now, press the mouse button again and drag the pink box over the notes you want to copy. The selected notes will turn pink (as shown in the image above).
When you release the mouse button, the copied notes will remain pink. This means they are ready to be pasted anywhere in the score. To paste them, place the square cursor on a rest where you wish the paste operation to take place.
ATTENTION! For a correct paste, the paste location must contain only quarter-note rests.
Next, press Ctrl + V, or press the right mouse button (Windows) or Control + mouse button (Macintosh), and select Paste from the pop-up menu. This will copy the selected notes to the new location.
If you need to copy chords in multiple bars, the score will automatically scroll to the right (or left) when you reach the edge of the screen.
To de-select the copied chords, simply drag the pink box over the white space above or below the staff lines. Alternatively, you can press the Esc button on your computer keyboard, and then press Deselect Chord from the pop-up menu.
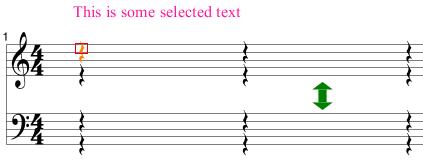
Copy & Paste Text
You can copy any of the text contained in the score by pressing Shift + left mouse button (Windows) or Shift + mouse button (Macintosh), then drag the pink box over the desired text. When you release the mouse button, a green arrow will appear on the score. This points at the location where the text will be pasted. You can change this location by clicking on different places in the score:
To paste the copied text, simply press Ctrl + V, or press the right mouse button (Windows) or Control + mouse button (Macintosh), and select Paste from the pop-up menu.
To de-select the copied text, simply drag the pink box over an area containing no text. Alternatively, you can press the Esc key on your computer keyboard, and then press Deselect Text from the pop-up menu.
Mass Delete
This function can be used to delete portions of the score. First select the chords you wish to delete by enclosing them with the pink box, using the method described in the Copy & Paste Chords section. Next, press the Delete button on your computer keyboard or use the menu item Edit > Mass Delete. This will convert all the notes to quarter-note rests. If you wish to undo this operation, you can press the Undo button in the Insert panel, or press the Ctrl + Z shortcut.
ATTENTION! The Mass Delete function cannot be applied to text or lines. These elements must be deleted individually.
Zoom
There are 5 zoom levels for the score:
Level 1: Mini
Level 2: Small
Level 3: Normal (default zoom level)
Level 4: Large
Level 5: Mega
To activate a zoom level, use the Ctr + O to zoom out (smaller), or Ctrl + I to zoom in (larger).
ATTENTION! Due to space restrictions, zoom will not work when the Builder panel is open.
Undo/Redo Actions
Most actions performed during the composition or editing process can be
undone or redone, up to a total of 7 actions, using the Undo and Redo buttons in the Insert panel..
| The Rules |
The rule applied by each button in the Checker panel is summarized by a tool-tip which appears when you place your mouse over the button. Here is a summary of the tool-tips:
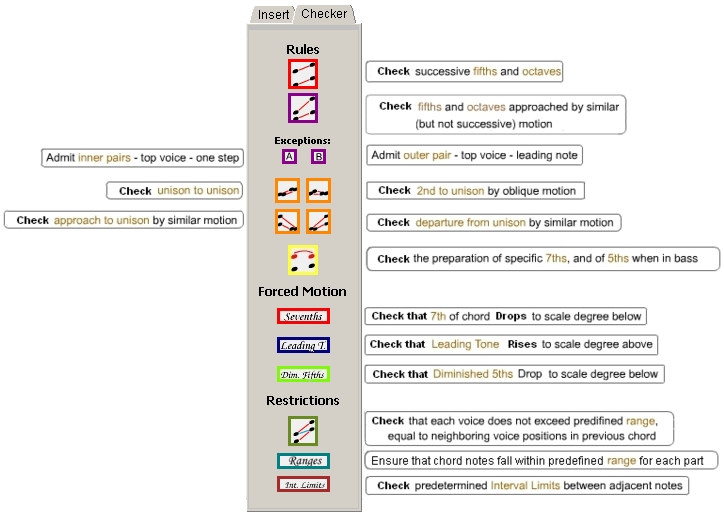
Below is a more detailed description of each rule:
The "Red Rule" ![]()
Avoid Consecutive Octaves and Fifths (also known as Parallel, or Successive, Octaves and Fifths)
This is one of the fundamental rules of counterpoint, dating back to pre-Baroque times. The purpose is to avoid losing the individuality of the voices, as well as to reduce the somewhat "hollow" sound produced by octaves and fifths, which duplicate the 1st and 2nd overtones of the lower note. A chord containing an octave and/or fifth will sound less rich than a chord containing a third, for example. Therefore, successive chords containing adjacent octaves and/or fifths are considered an unacceptable impoverishment.
The red button will activate the function that places two red lines between any pair of notes that break the above rule. Following are examples of successive octaves and fifths being shown as errors by the Checker:
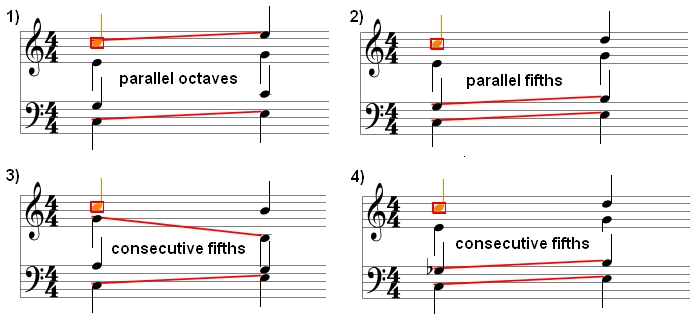
Note that in example 4), the first "fifth" is diminished. Many text books consider this to be an unacceptable transition, so it has been included in the check for consecutive fifths.
The "Purple Rule" ![]()
Avoid octaves and fifths approached by similar motion, where the first interval is not an octave or fifth.
Otherwise known as "hidden", "direct", "covered", or "exposed" octaves and fifths. By pressing the purple button, the Checker will mark with purple lines any interval of an octave or fifth approached by similar motion which is not parallel or consecutive motion. Errors due to parallel or consecutive motion will continue to be checked by the "Red Rule".
This type of error is considered far less critical than parallel or consecutive fifths and octaves, and many exceptions have been applied over the centuries. In the present version of HarmonyBuilder, only two common exceptions (A and B) have been included. It is left to the users's discretion to take heed or disregard the "purple error" markings, according to how strictly they wish to follow the rules of harmony. Below is a list of the main exceptions found in theory books and in common practice:
Exception A: Allow a hidden octave or fifth if it is NOT between the Soprano and Bass, and if the top voice moves by one step. For example, the following hidden fifth would be acceptable:
Exception B: Allow a hidden octave or fifth if it occurs between the Soprano and the Bass, and the Soprano is a Leading Tone moving up one step. For example, the following hidden octave would be acceptable:
Ecxeption C: Allow a hidden octave or fifth if the top voice moves by one step. This is equivalent to Exception A, with the added possibility for the Soprano in the Bass-Soprano interval to move by one step (even if it is not a rising Leading Tone). For example, the following hidden fifth would be acceptable:
Exception D: Allow a hidden octave or fifth if it involves only the Alto and Tenor. For example, the following hidden fifth would be acceptable:
Exception E: Allow a hidden octave or fifth if it doesn't involve the Bass and Soprano. This would be similar to Exception D, but extended to include the intervals between Bass-Tenor, Bass-Alto, Tenor-Alto, Tenor-Soprano and Alto-Soprano.
Exception F: Allow a hidden octave or fifth if the interval is approached in one part by a semitone step. For example, the following hidden fifth would be acceptable:
Exception G: Allow a hidden octave or fifth if the error is created while changing the voice positions of the same chord. This is equivalent to applying Exception E to the passage between identical but re-voiced chords, with the addition of allowing for hidden octaves or fifths between bass and soprano. For example, the following hidden fifths would be acceptable:
Note: The best way to avoid parallel or hidden fifths and octaves is to approach these intervals by either oblique or contrary motion. This type of motion will never generate errors (apart from the rare case of consecutive fifths or octaves approached by contrary motion).
The "Orange Rules" 
Avoid Unison Errors
The following 4 errors involving unisons are maked with orange lines:
Unison to Unison:
This function will mark any two adjacent notes that move from one unison to another unison. For example, the following situation would show a unison error.
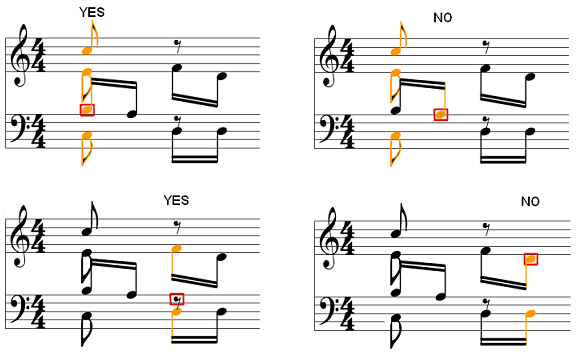
2nd to Unison by Oblique Motion:
This function will mark any two adjacent notes that move from an interval of a major or minor second (or diminished 3rd) to a unison, by oblique motion (i.e. one of the voices remains the same). For example, the following situation would show a unison error.
Approach to Unison by Similar Motion:
This function will mark any two adjacent notes that move from any interval to a unison by similar motion (i.e. both voices move either up or down). For example, the following situation would show a unison error.

Departure from Unison by Similar Motion:
This function will mark any two adjacent notes that move from a unison to any other interval by similar motion (i.e. both voices move either up or down). For example, the following situation would show a unison error.
Prepare specific 7ths and 5ths
When 7th chords are created, the rules of counterpoint require that the 7th note be "prepared" (with some exceptions, explained later). This means that the 7th must be tied to a note of equal pitch, and of at least the same length, in the previous chord. For example:
This rule has arisen due to the difficulty of intonation of any note in a chord that is dissonant with respect to its other chord members. Since the 7th is very dissonant with the root of a chord, having this note hold over from the previous chord eliminates the difficulty of pitching it in the next chord.
An exception has been made for Primary Seventh chords. Since the 7th was originally a passing note between the the root of the chord and its resolution, singers became habituated to pitching the 7th, and therefore it is not required to prepare these 7ths, except in the case of a 7th chord on the VII degree of the major scale in third inversion, when the 7th (which normally does not need to be prepared) must be prepared. The reason is that it forms a dissonant interval with the VII degree note, which is itself a dissonant note within the key.
Preparations also pertain to some 5ths. When 7th chords are in second inversion, the 5th (which is now in the bass) must be prepared as well as the 7th (with some exceptions, explained below).
The reason a 5th in the bass of a 7th chord must be prepared is that the interval of a perfect 4th between the bass note and the root of the chord was considered dissonant during the Baroque Era, and therefore difficult to pitch correctly, so a preparation from the previous chord was required. The exceptions to this rule are the following:
The second inversion of a Dominant Seventh chord does not require the preparation of the 5th, since the 5th is only a step above the Tonic degree, which helps intonation.
If any of the specified 7ths or 5ths are not correctly prepared, they will be marked with a yellow circle around the note that requires preparation, once the Preparations check button has been selected:
The interval of a 7th is very dissonant, and needs to be resolved. By resolving down one step, it can reach an optimal consonant resolution, usually to a consonant 3rd interval. Resolving the 7th upwards will result in a number of harmonic errors, such as hidden fifths, or 2nd to Unison by Oblique Motion (or Ninth to Octave by Oblique Motion). It has therefore been common practice, for the past two and a half centuries, to resolve the 7th by making it move one step down the diatonic scale.
Any note that does not descend diatonically step-wise from a 7th note will be marked with a red circle, if the Sevenths check button is selected. In the example below, the 7th (marked in orange), should descend to an E, so the C has a red circle around it since it is not the correct resolution note:
The Leading Tone (or Leading Note) is the note found on the VII degree of the major or harmonic minor scale. It is found in chords built on the I, III, V and VII degrees of the scale. When this note forms part of an imperfect consonance (3rd or 6th), it will tend to resolve by moving a half step UPWARDS in the passage to the next chord, in which it should form a perfect consonance (unison, octave, perfect 4th or perfect 5th). These conditions do not generally apply to the I7, III or III7 chords. In the case of I7, the leading tone functions more like a 7th, which has a tendency to drop; in the case of the III or III7, the leading tone forms a perfect 5th interval with a lower note in the chord, giving it relative stability.
In the examples below, the Leading Tone is colored orange, and resolves correctly:
In the following example, the Leading Tone does NOT resolve correctly, and (when the Leading Tone check button is selected) the incorrectly resolved note will be marked with a blue circle:
Diminished Fifths ![]()
Diminished fifth intervals can be found in the following chords: V7, VII, VII7, II (minor keys only) and II7 (minor keys only). For reasons similar to those described in the section on Sevenths, the upper note in a diminished fifth interval will generally move DOWN by a half step, forming a consonant interval of either a 3rd or a 4th. To do otherwise would create hidden fifths, since the Leading Tone is often the lower note in a diminished fifth interval, and should rise by a half step. Here is an example of a diminished fifth interval with an incorrect resolution:
The Diminished Fifths checker will mark the incorrectly resolved note with a green circle.
In the case of a VII7 chord in a minor key, there are two diminished fifths, as shown in this example:
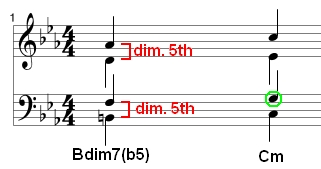
Please note that the Diminished Fifths checker will NOT mark arrors pertaining to the upper diminished fifth error, since it overlaps with the Sevenths check. Provided the Sevenths check is activated, this upper diminished fifth error will be marked with a red circle, since a seventh that must descend. Similarly, the Diminished Fifths checker will not consider the 7th in a V7 chord as a diminished fifth, since this note will be treated as a 7th for rule checking purposes.
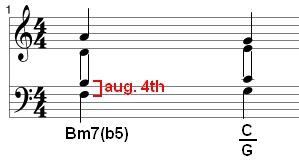
Note also that the inversion of a diminished fifth is an augmented fourth. In this case, there is no requirement for the lower note forming an augmented fourth interval to move in a specific direction. As shown in the example below, both notes forming the augmented 4th can move upwards:
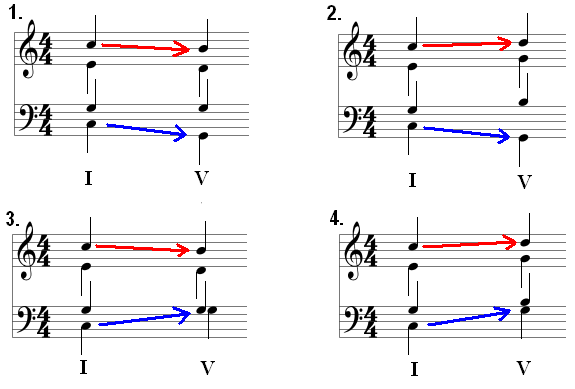
This feature marks with an olive-colored cross any note that moves beyond the neighboring voice position in the previous chord, thus disrupting the melodic line of each part.
For example:
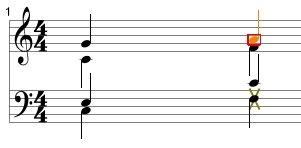
The Bass note moves up to an F, which is above the E in the previous chord, and for this reason it is marked with a cross. The reason this note position is undesirable is because the voice leading becomes misleading! The ear will easily confuse the melodic line of the Tenor, which should be E going to a C, with an E going to an F. Since the F Bass note is positioned between the first and second Tenor notes, it will draw the E towards the closer-sounding F, and not the C.
The range limitations imposed by this consideration can be exemplified by the following diagram:
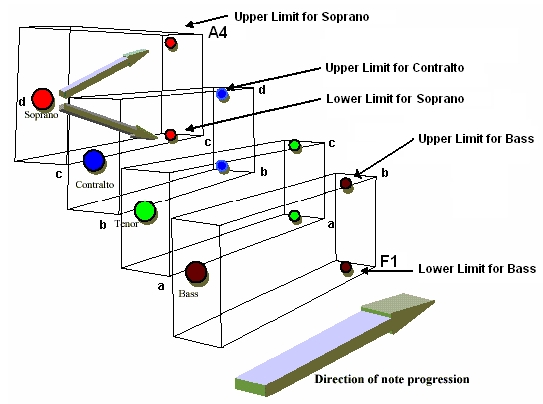
The absolute upper and lower limits are shown as A4 for the soprano, and F1 for the bass, since these are the practical ranges for choral music.
Please note that the convention for describing notes in their respective octaves is the alphanumeric system, where middle C is described as C3:
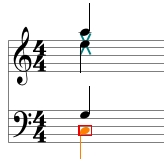
This setting will mark (with a teal-colored cross) all notes that exceed the range limits for each part, as defined in the Range Selection panel.
In the following example, the Alto has moved beyond its range:
The normal ranges for the Bass, Tenor, Alto and Soprano parts are shown in the default settings of the Range Selection panel. These are considered to be the normal singing ranges for these voices.
You can modify the ranges that are marked by the Range Restriction checker by changing the values in the Range Selection panel.
The maximum interval between two adjacent notes is set as follows:
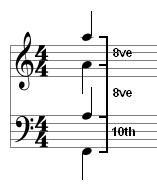
These settings are hard-wired, and cannot be changed.
When the Interval Limits button is selected, it will mark (with a brown bracket) the intervals between adjacent notes that exceed the predefined limit.
Here is an example of some interval limits being breached:
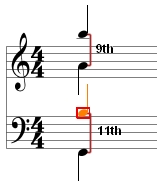
Please note that some academics consider the acceptable limit between Bass and Tenor to be as much as a 12th. Therefore, intervals between the Bass and Tenor that are greater than a 10th but less than or equal to a 12th could be considered acceptable, even though they will be marked with a brown bracket.
Also, an interval that is less than or equal to a major third between the Bass and Tenor voices will be marked as an error, since the clarity of each note is jeopardized when they move too close together. This is because the overtones start to conflict, producing dissonances rather than consonances.
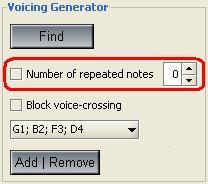
For example, the chord shown below contains a Soprano note that has moved below the Alto note:
By activating Block voice-crossing, cases like this will be eliminated from the results list.
The Menus
File Menu
Below is the open File Menu:
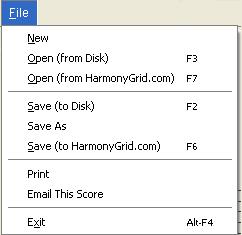
Below is a description of each item:
Edit Menu
Below is the open Edit Menu:
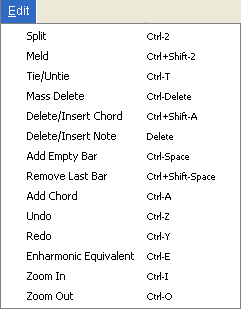
Below is a description of each item:
Settings Menu
Below is the open Settings Menu:
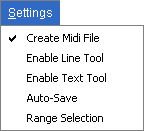
Below is a description of each item:
Help Menu
Below is the open Help Menu:
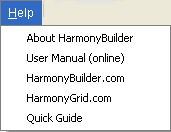
Below is a description of each item:
Keyboard Shortcuts
Most of the on-screen commands are also available as keyboard shortcuts. Here is a comprehensive list:
| Keystrokes | Action |
| Up Arrow | Move square cursor up |
| Down Arrow | Move square cursor down |
| Left arrow | Move square cursor left |
| Right arrow | Move square cursor right |
| Shift + up arrow | Nudge note up one step |
| Shift + down arrow | Nudge note down one step |
| Enter | Play/Stop |
| Spacebar | Hear selected note or chord |
| Del | Delete/Insert note |
| Ctrl + A | Delete/Insert Selected Chord |
| Ctrl + Shift + A | Delete/Insert Default Chord |
| Shift + Del | Delete selected text or line |
| < | Make note shorter |
| > | Make note longer |
| Ctrl + 2 OR Ctrl + S | Split note |
| Ctrl + M OR Ctrl + Shift + 2 | Meld note |
| Ctrl + T | Tie/Untie |
| Ctrl + 3 | Create Triplet |
| Ctrl + Shift + 3 | Remove Triplet |
| Ctrl + E | Change note enharmonically |
| Ctrl + Space bar | Add bar |
| Home | Jump to first bar |
| End | Jump to last bar |
| Shift + left arrow | Jump to previous bar |
| Shift + right arrow | Jump to next bar |
| F2 | Save (To Disk) |
| F3 | Open (From Disk) |
| Ctrl + Z | Undo |
| Ctrl + Y | Redo |
| Ctrl + I | Zoom In |
| Ctrl + O | Zoom Out |
Footnotes
[1]
A necessary condition for the 3 Forced Motion buttons to generate filtered results is that the Target Key must contain the Previous Chord. If a chord that is foreign to the Current Key is inserted into the score, then be sure to select a Target Key that contains the foreign chord. Otherwise, the Voicing Generator will not generate any results (unless you de-select the Forced Motion filters).
The Seventh and Leading Tone buttons will always become active whenever a chord containing a Seventh or a Leading Tone is recognized, even if it is outside the Current Key. To generate results with the Voicing Generator panel, either adjust the Target Key, as described above, or de-select the Forced Motion buttons.
The reason these filters cannot be used on chords outside the Current Key without manually changing the Target Key is because the correct resolution of the Seventh, Leading Tone and Diminished Fifth is dependent upon the recognition of the chord's function, and when a chord is outside the Current Key, its chord function can no longer be automatically identified.
To ensure the correct resolution of Diminished Fifths while using chords that are outside the Current Key, or when using Target Keys that differ from the Current Key, enable the Coloration feature. This will identify all 5ths with green coloration. You will then have to establish if the green note represents a diminished fifth (d5), a perfect fifth (P5) or an augmented fourth (A4), since all three will be marked as green. You can then decide if the 5th should move down step-wise.
[2]
There are various conventions attached to the use of upper case or lower case Roman Numerals. Usually, upper case refers to some form of major chord, and lower case is used to describe some form of minor chord. HarmonyBuilder uses a different (unorthodox) convention because, in addition to being simple to understand and use, it has the advantage that it instantly describes whether the given chord is part of a major or minor key.
This is not always immediately obvious from the orthodox system. For example, V7 could refer to C major or C minor; iim7 could refer to C major or C minor, depending on whether the fifth of the chord is perfect or diminished.
In the convention adopted by HarmonyBuilder, V7 refers to C major, v7 refers to C minor, II7 refers to C major and ii7 refers to C minor, leaving no room for ambiguity.
[3]
Because we always know the Key of a piece of music, and can therefore determine if the underlying scale is major or minor, there is no need to specify the full names of the intervals between the Bass note and the upper notes. It is sufficient to specify the combination of 2nds, 3rds, 4ths, 5ths, 6ths, 7ths and 8ves, irrespective of whether they are diminished, minor, major, perfect or augmented. The scale on which they are built will determine the exact quality of the intervals.
For example, Figured Bass vii7 automatically implies a diminished 7 chord, since this is the type of 7th chord that is found on the 7th degree of the harmonic minor scale. Similarly, Figured Bass iii6 automatically implies a minor chord in first inversion, since this is the only type of chord that has intervals of 3 and 6 above a Bass note on the 3rd degree of the minor scale.
Here is a chart that shows the abbreviations (or shorthand) used in the practice of Figured Bass:
[4]
The following diagram illustrates that there are many different ways in which the 4 notes of a chord can be arranged in the score. They can be closely packed at the bottom of the register (far left side of the diagram), or at the top of the register (far right side of the diagram), or distributed in other ways throughout the score:
By applying certain restrictions to the way notes are placed in the score, we can reduce the options to a manageable set.
[5]
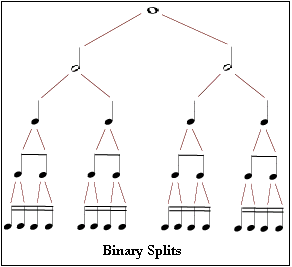
The Split function is a quick way to add passing notes to a score, because it converts a note into two notes of half the length. The following diagram show the different levels of division obtainable with the Split function:
[6]
The Meld funtion will convert the selected note into one note with twice the duration of the selected note, provided there is a note of equal pitch and duration on the right of the selected note.
ATTENTION! Melding is not possible between two notes of equal pitch and duration in two separate triplets. Instead, you should tie the two notes together using theTie/Untie button.
[7]
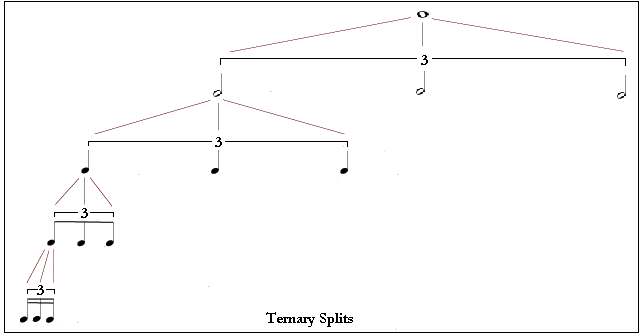
The Triplet > Yes button will convert the selected note into three notes with one third the duration of the selected note. The following diagrams show the different levels of division obtainable with the Triplet button:
[8]
When a note is nudged up or down the chromatic scale, the note alteration symbols have been chosen to reflect the most commonly used chord extensions on a dominant chord.
For example, in the Key of C major, we have the following extensions of a G7 chord:
G = root
Ab = flat ninth
A = ninth
A# = sharp ninth
B = third
C = fourth
Db = flat fifth
D = fifth
D# = sharp fifth
E = thirteenth
F = seventh
F# = major seventh
while in the Key of C minor, we have the following extensions of the G7 chord:
G = root
Ab = flat ninth
A = ninth
A# = sharp ninth
B = third
C = fourth
Db = flat fifth
D = fifth
Eb = flat thirteenth
E = thirteenth
F = seventh
F# = major seventh
 will be recognized as: